
Update 08.04.2023
I’ve updated this solution to V2 which includes the capability to assign, unassign and reserve phone numbers along with other improvements.
Please read this article when you have finished reading this one.
/Update
Every Teams Voice Admin that has deployed Direct Routing knows the struggle. There’s no way to manage Direct Routing numbers in Teams Admin Center. This makes it hard for us to get a clear overview of which numbers are still unassigned/free or even to see all the numbers we have.
Obviously, there’s a solution for anything. We can use PowerShell to export numbers and create our own lists in Excel or whatever. The challenge with that is to keep the list up to date, error free and make it centrally available for all people who need to work with it.
There are also lots of vendors which offer Teams phone number management platforms. Here are some of them:
Number Management for Microsoft Teams (callroute.com)
Clobba Range Manager — DID Number Management — Code Software
They all have powerful features — which come with a price. But what if we don’t need a full-fledged management solution and just want a simple overview which is dynamically updated?
That’s exactly what I’ve been building in my spare time over the last few weeks.
The final product is a SharePoint list which gets automatically updated by an Azure Automation Runbook every hour.
This time around, I tried to automate everything I could. This means less work for you if you want to deploy it yourself. But before we get into the technical details of it, let’s look at the list.
TL;DR
If you don’t care about the details and want to deploy straight away, you can grab the code from here.
The List
The Columns
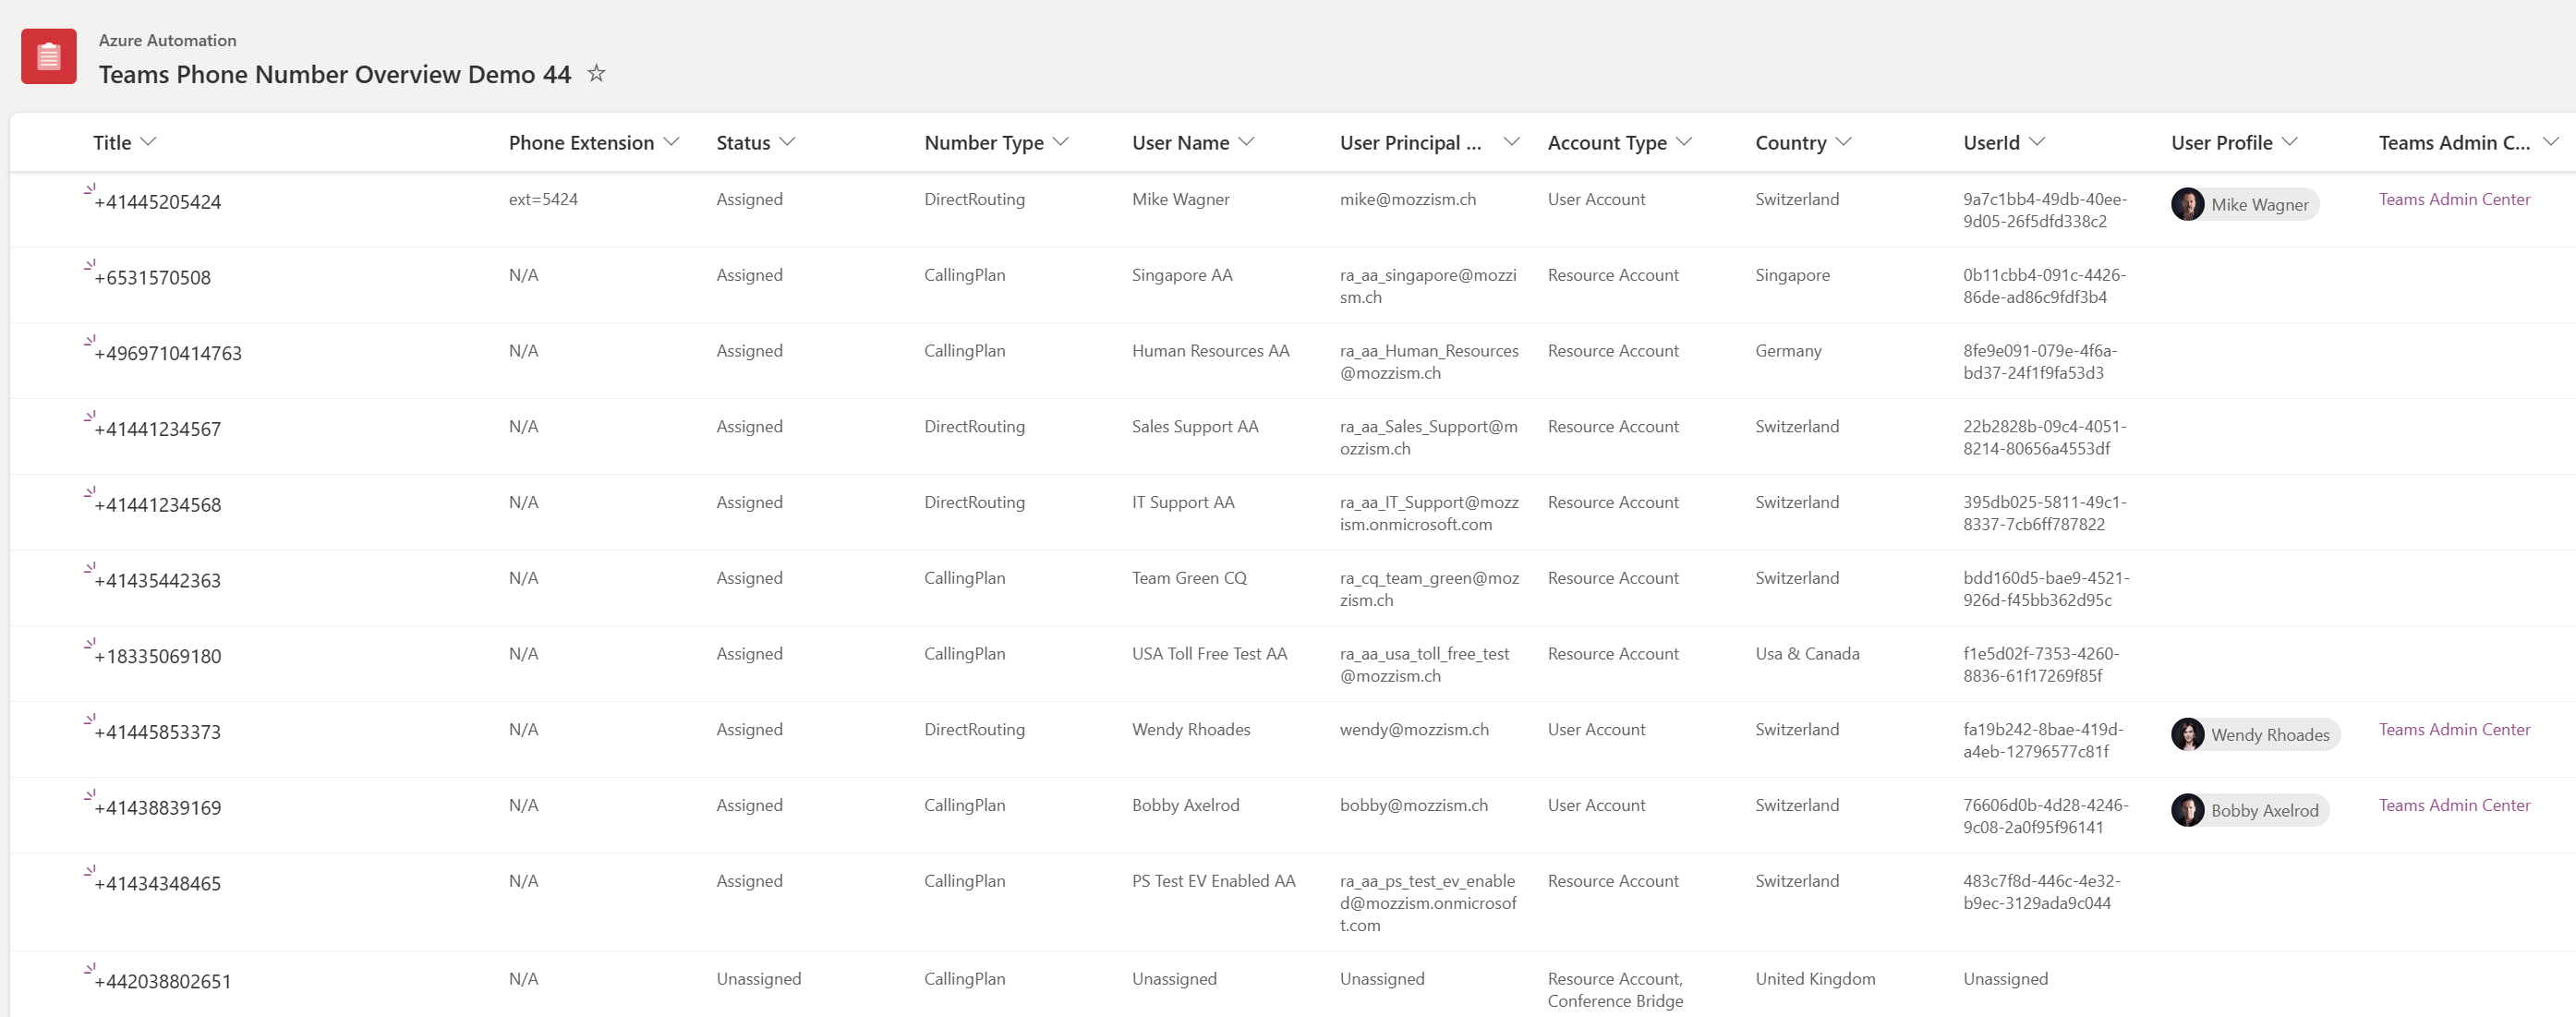
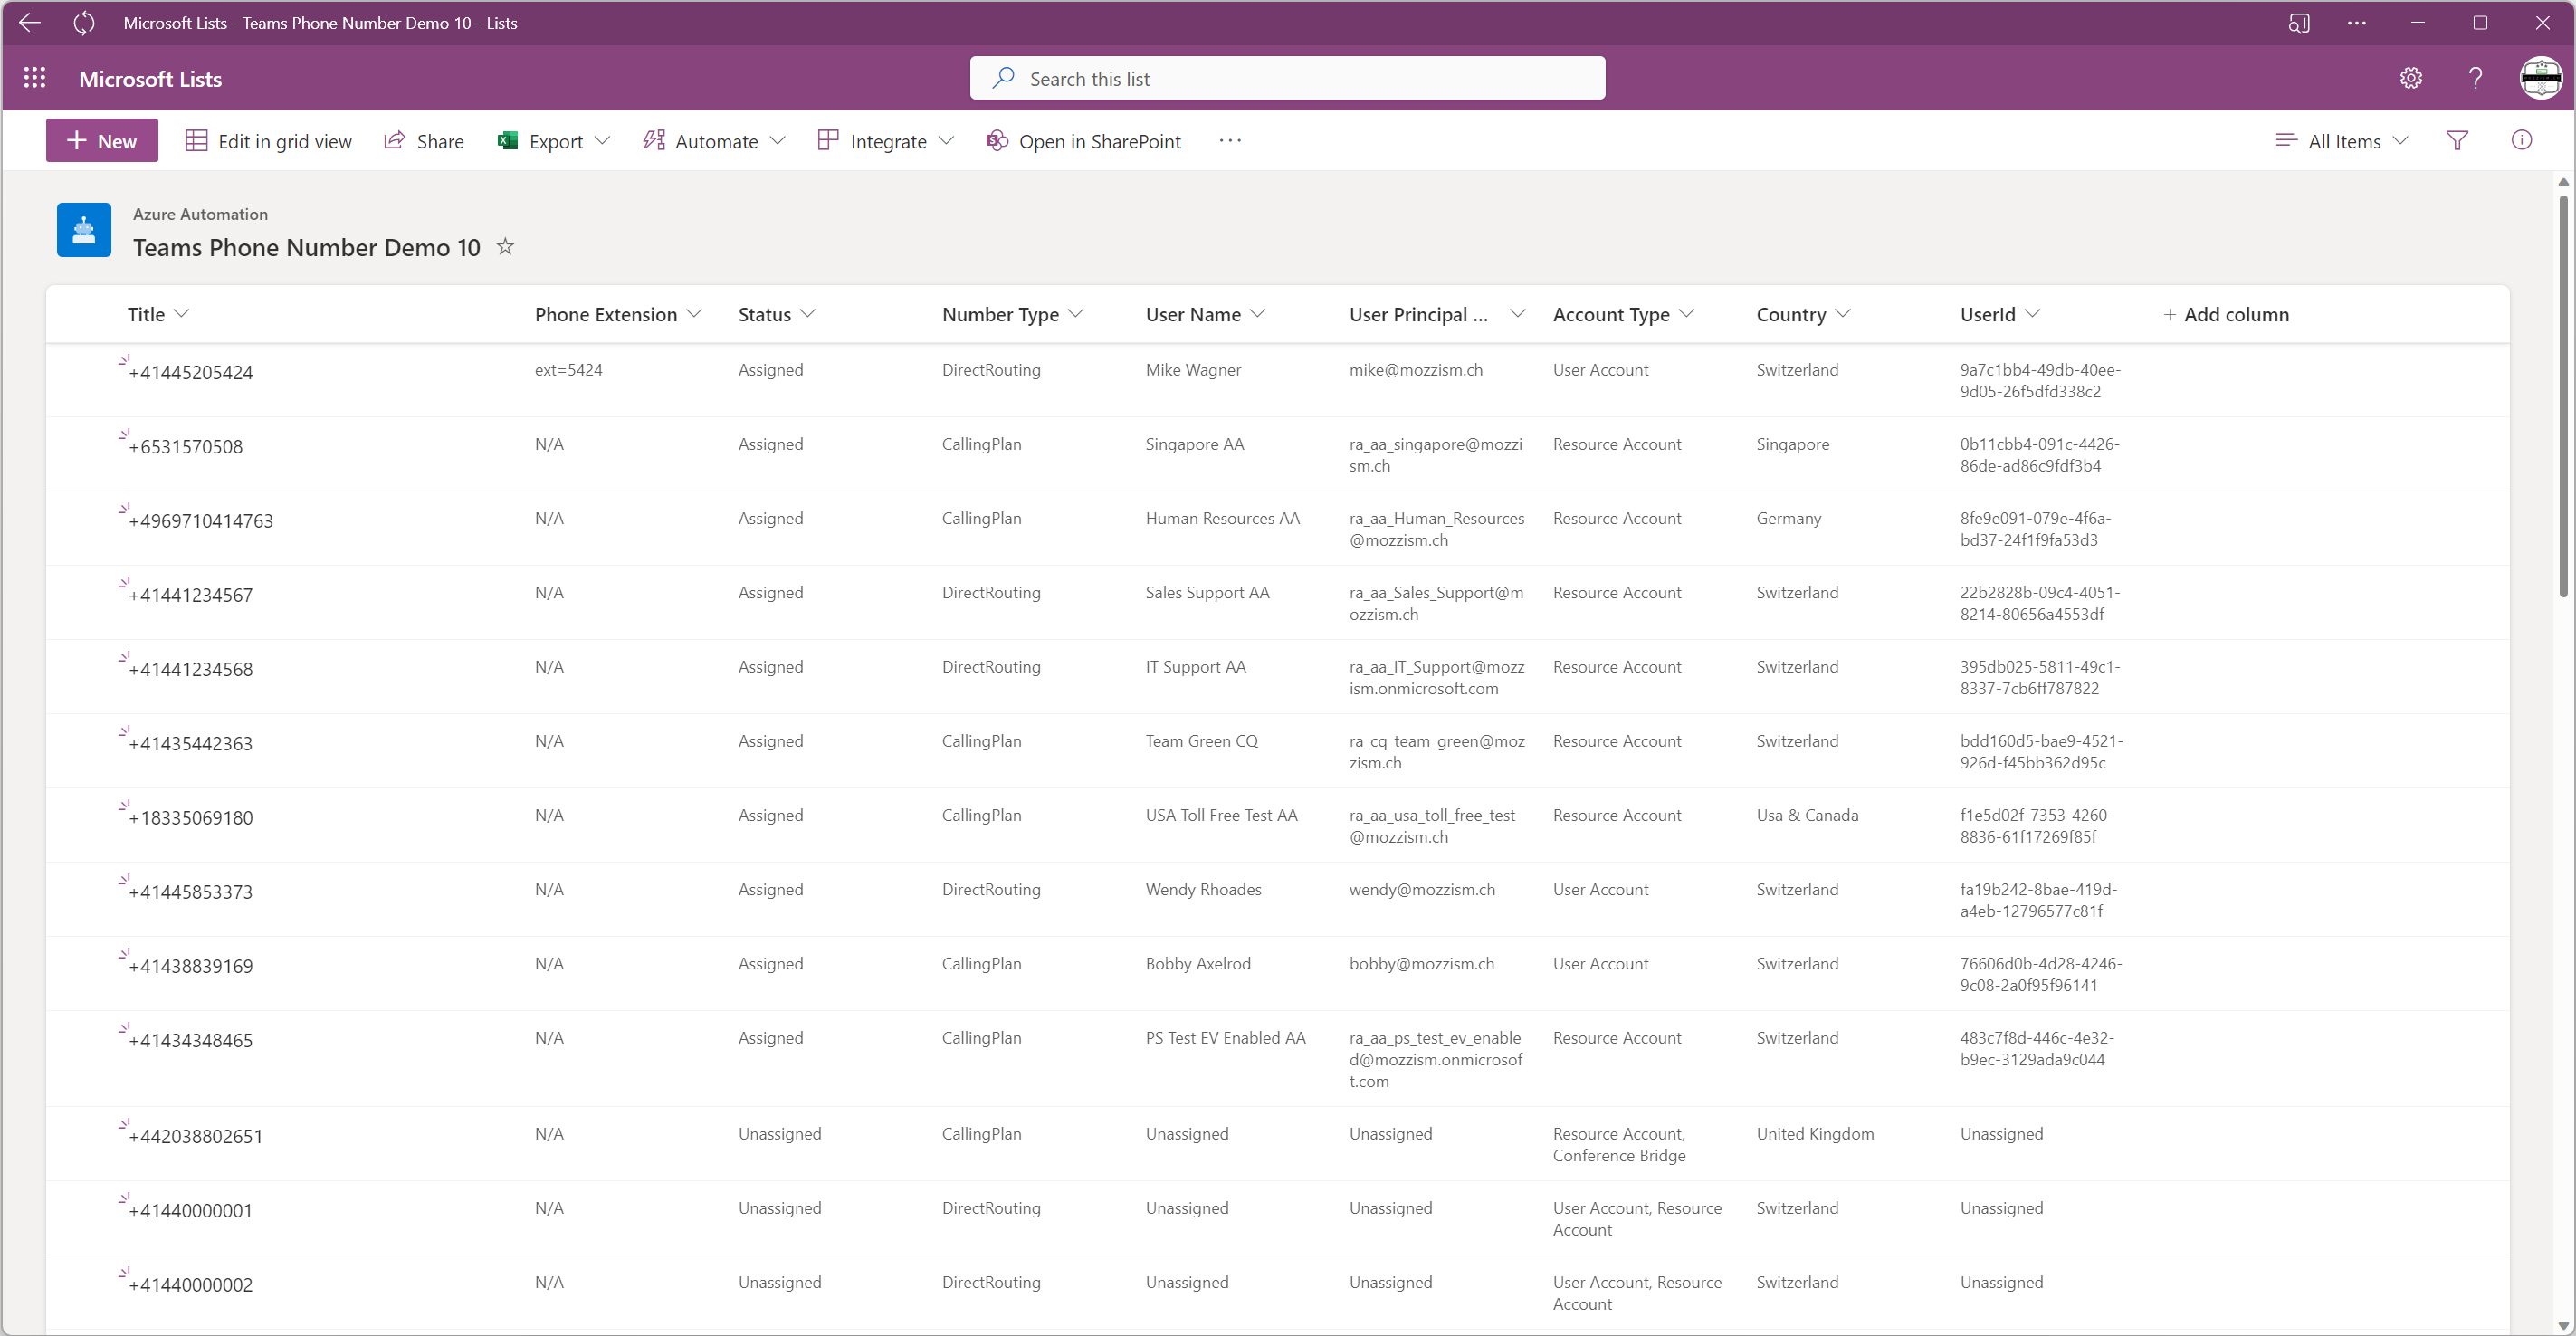
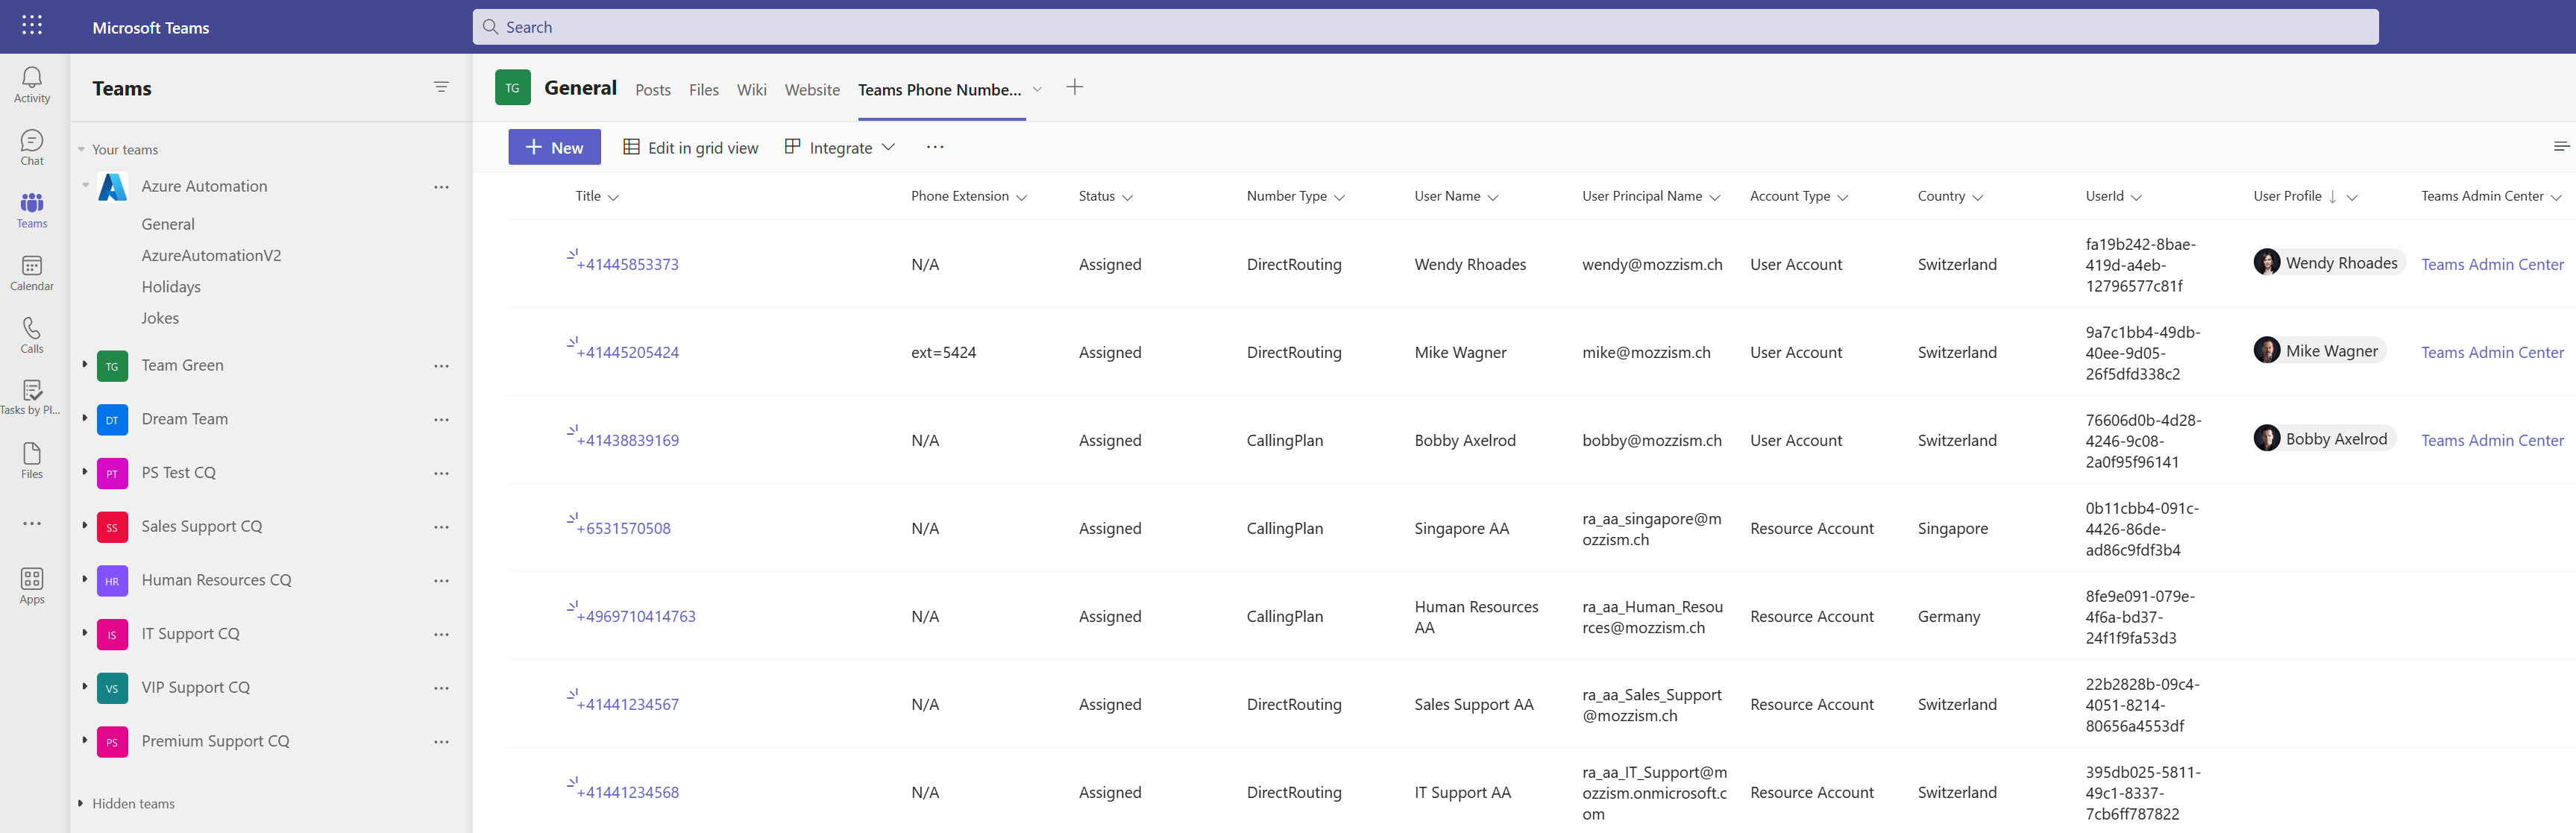
The list can be viewed in SharePoint Online, Microsoft Lists or directly in Teams through Lists. It consists of the following columns.
- Title = Phone Number
- Phone Extension = Extension if there is one configured
- Status = Assigned/Unassigned
- Number Type = Direct Routing / Calling Plan / Operator Connect
- User Name = Display Name of assigned account
- User Principal Name = UPN of assigned account
- Account Type = User Account / Resource Account / Conference Bridge
- Country = The country a number belongs to
- UserId = Object Id from Azure AD
- User Profile = Profile Card
- Teams Admin Center = Link to manage the user in TAC
This should cover most of the relevant information somebody might want to know about their phone numbers.
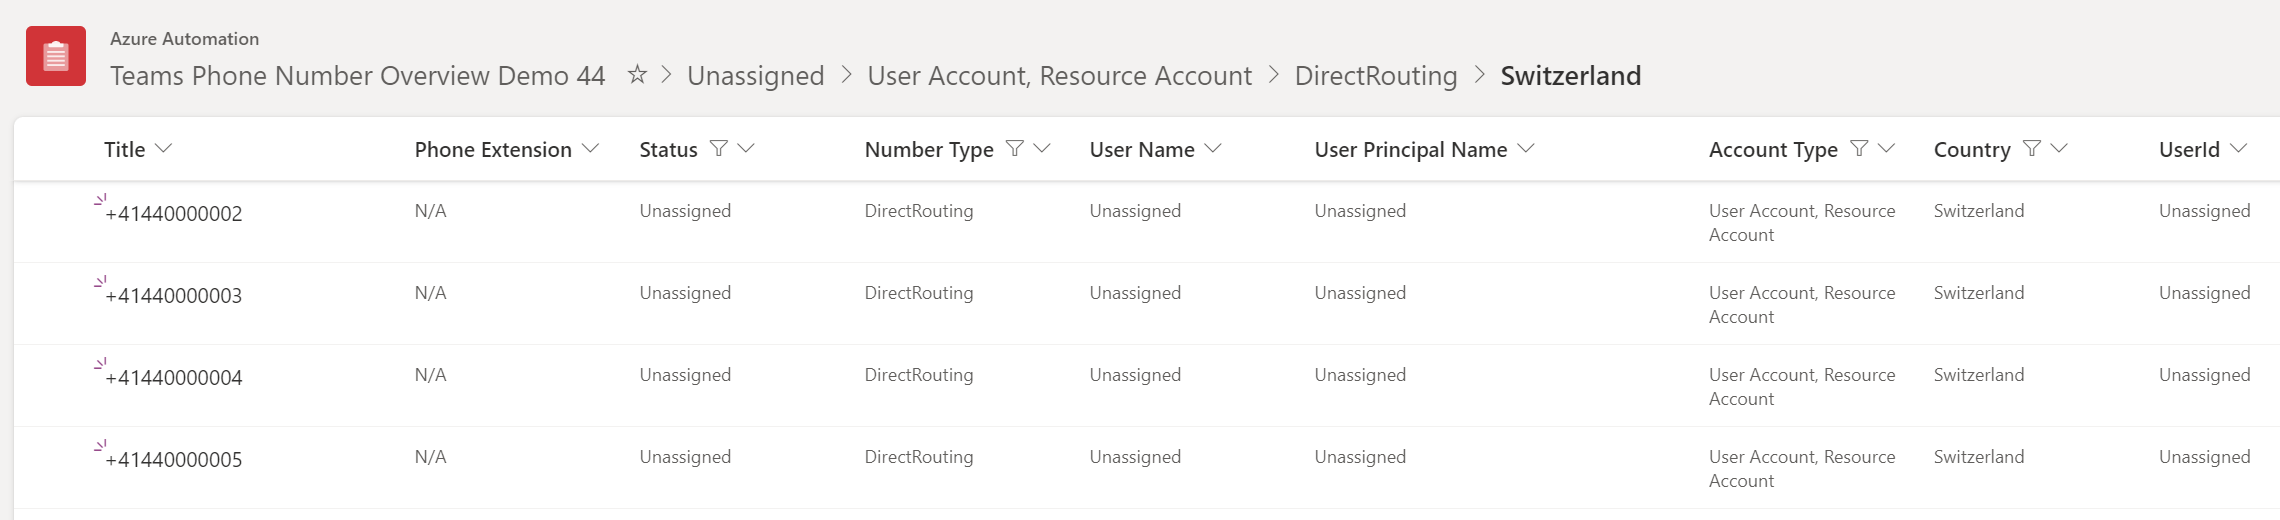
Filtering
Having all that information available allows us to easily filter numbers which meet certain criteria. In this example, I filtered the list for all unassigned numbers from the UK.

Because this number is unassigned and it could be assigned to a Resource Account or a Conference Bridge, both types are included in the list.
If we compare that to an assigned service number, we can see that the Account Type is shown as Resource Account because the number is assigned to one.

The most common thing which people probably want to see at glance is which direct routing numbers are unassigned from a specific country. This can also be achieved very easily.
I learned a lot during the development of this project, and I now want to share that with you. Let’s take a look at how the SharePoint list was built and how it automatically updates itself with the help of Azure Automation.
Deployment
There are very few manual tasks required to get this set up. I built a deployment script which will create all the required resources in Azure for you.
Clone The GitHub Repo
Start by cloning or downloading the GitHub Repo.
mozziemozz/TeamsPhoneAutomation: Automation Scripts for Microsoft Teams Phone (github.com)
If you’ve never worked with GitHub before, I highly recommend trying it instead of just downloading the repository as a zip file. All you need to do is sign up for an account, install the desktop client and clone the repo.
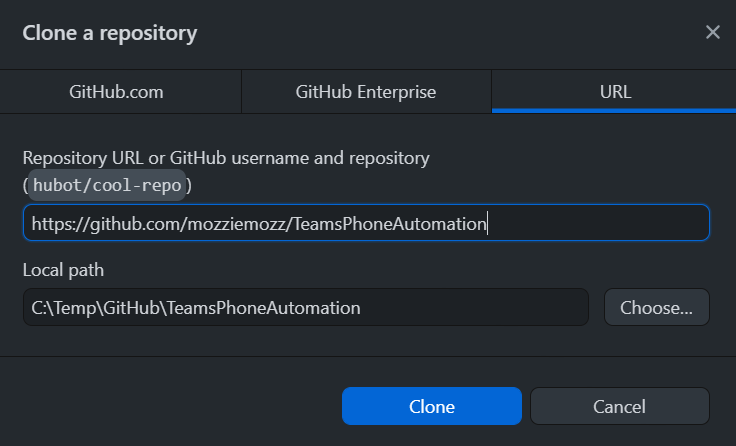
Once you have signed into GitHub Desktop, just head over to the repository URL and open it in GitHub Desktop.
Then choose your local folder and click on clone. Make sure to select a folder which isn’t synchronized to any kind of cloud Storage like OneDrive. The constant syncing of files would impair your performance dramatically.
The repo contains the following files and folders.
C:\TEMP\GITHUB\TEAMSPHONEAUTOMATION
│ .gitignore
│ Deploy.ps1
│ README.md
│
├───Functions
│ Connect-MgGraphHTTP.ps1
│ Connect-MsTeamsServicePrincipal.ps1
│ Get-CountryFromPrefix.ps1
│ Get-CsOnlineNumbers.ps1
│
├───Resources
│ CountryLookupTable.json
│ CreateList.json
│ DirectRoutingNumbers.csv
│ Environment.json
│
├───Scripts
│ TeamsPhoneNumberOverview.ps1
│
└───Setup
Setup.ps1
UpdateDirectRoutingNumbers.ps1
Environment.json
Before we do anything, we need to define a few things and names. In .\Resources open the Environment.json file and fill in your own information.
{
“TenantId”: “4bffbf87-53a0-4fce-b58b-xxxxxxxxxxxx”,
“GroupId”: “aff7d27f-878d-422c-83bd-xxxxxxxxxxxx”,
“MSListName”: “Teams Phone Number Overview Demo”,
“ResourceGroupName”: “mzz-rmg-001”,
“AutomationAccountName”: “mzz-automation-account-001”,
“AzLocation”: “West Europe”
}
TenantId is your Tenant Id.
GroupId is the Object Id of the Microsoft Teams Team which hosts the SharePoint site where the list should be created.
MSListName will be the name of your List in SharePoint.
ResourceGroupName will be the name of the resource group which is created in Azure.
AutomationAccountName will be the name of the automation account which is created within the new resource group.
AzLocation is the Azure region where you want to deploy the resources.
You can find a list of all available regions and their names here.
Make sure you save the file once you’ve filled in all the information.
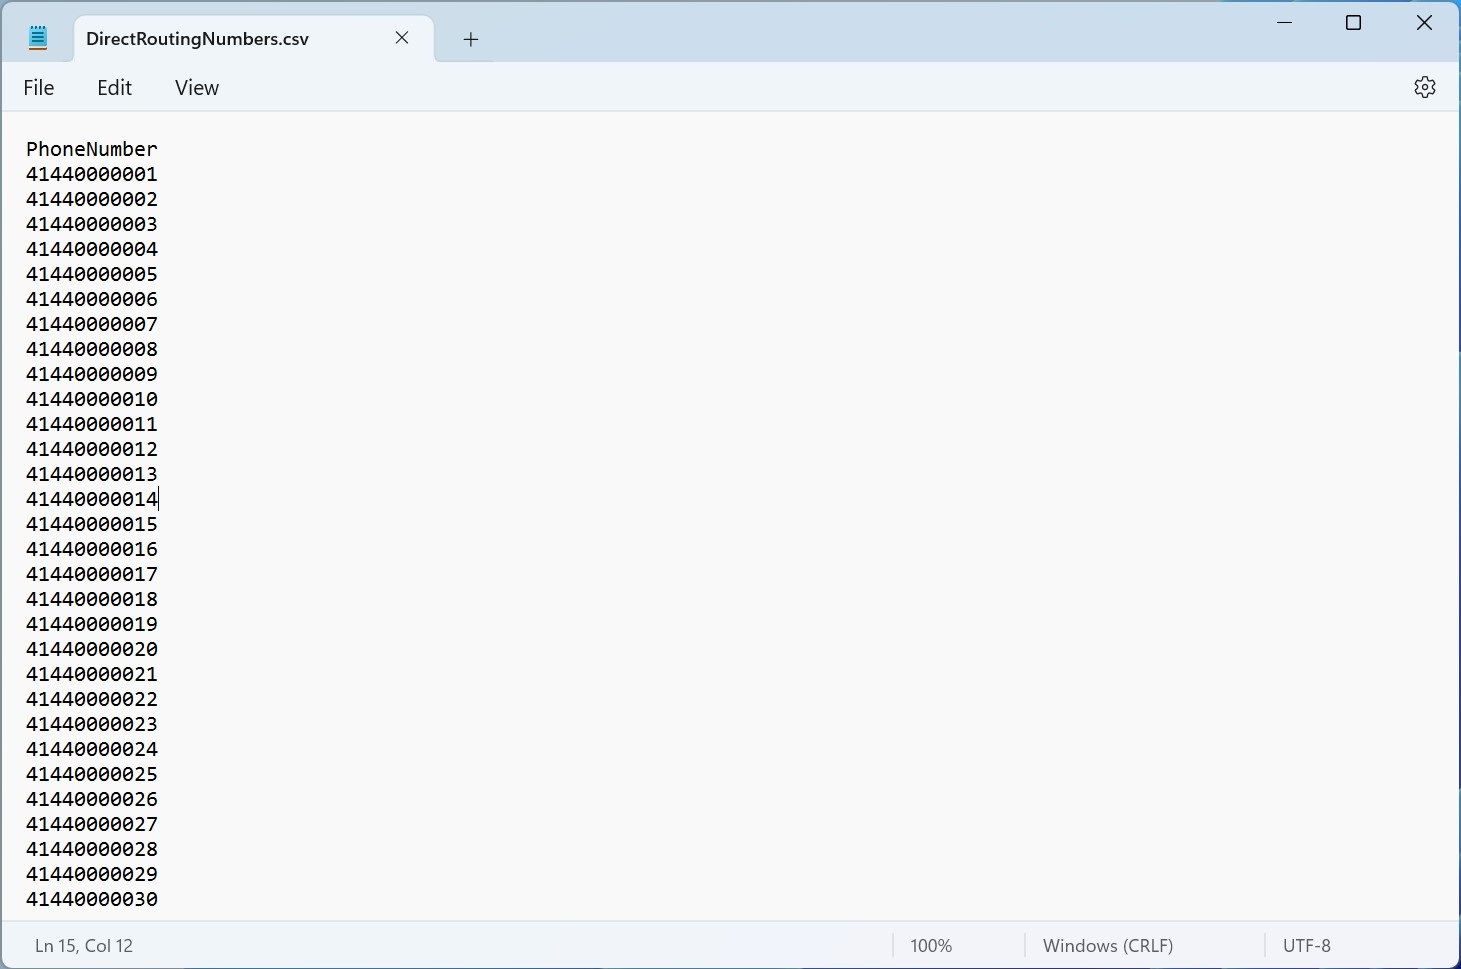
DirectRoutingNumbers.csv
Next, we need a list which contains all your direct routing numbers. This file can only contain one column called PhoneNumber. All the numbers must be in E.164 format but without the leading + . The plus sign will be added by the script later. It just makes things easier in Excel if we don’t need to bother about the plus.
That’s it for the preparation.
Deploy.ps1
Disclaimer: The script has been tested on a vanilla Windows 11 virtual machine where Windows Terminal is configured as default console host and sessions start in the parent process directory. No PowerShell modules were installed before the script was first executed on this system.
You will need an account with Global Administrator rights to successfully run this script. You also need local admin rights and need to make sure that running scripts is allowed on your machine.
In an elevated terminal, run the following code and close the terminal session once you have done so.
Set-ExecutionPolicy Bypass
To start the deployment, you need to run the Deploy.ps1 file.
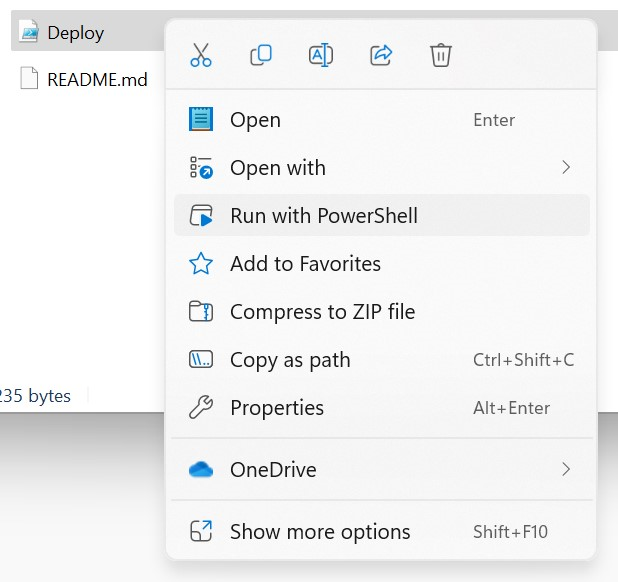
This will just call the .\Setup\Setup.ps1 script which is the real deal.
Setup.ps1
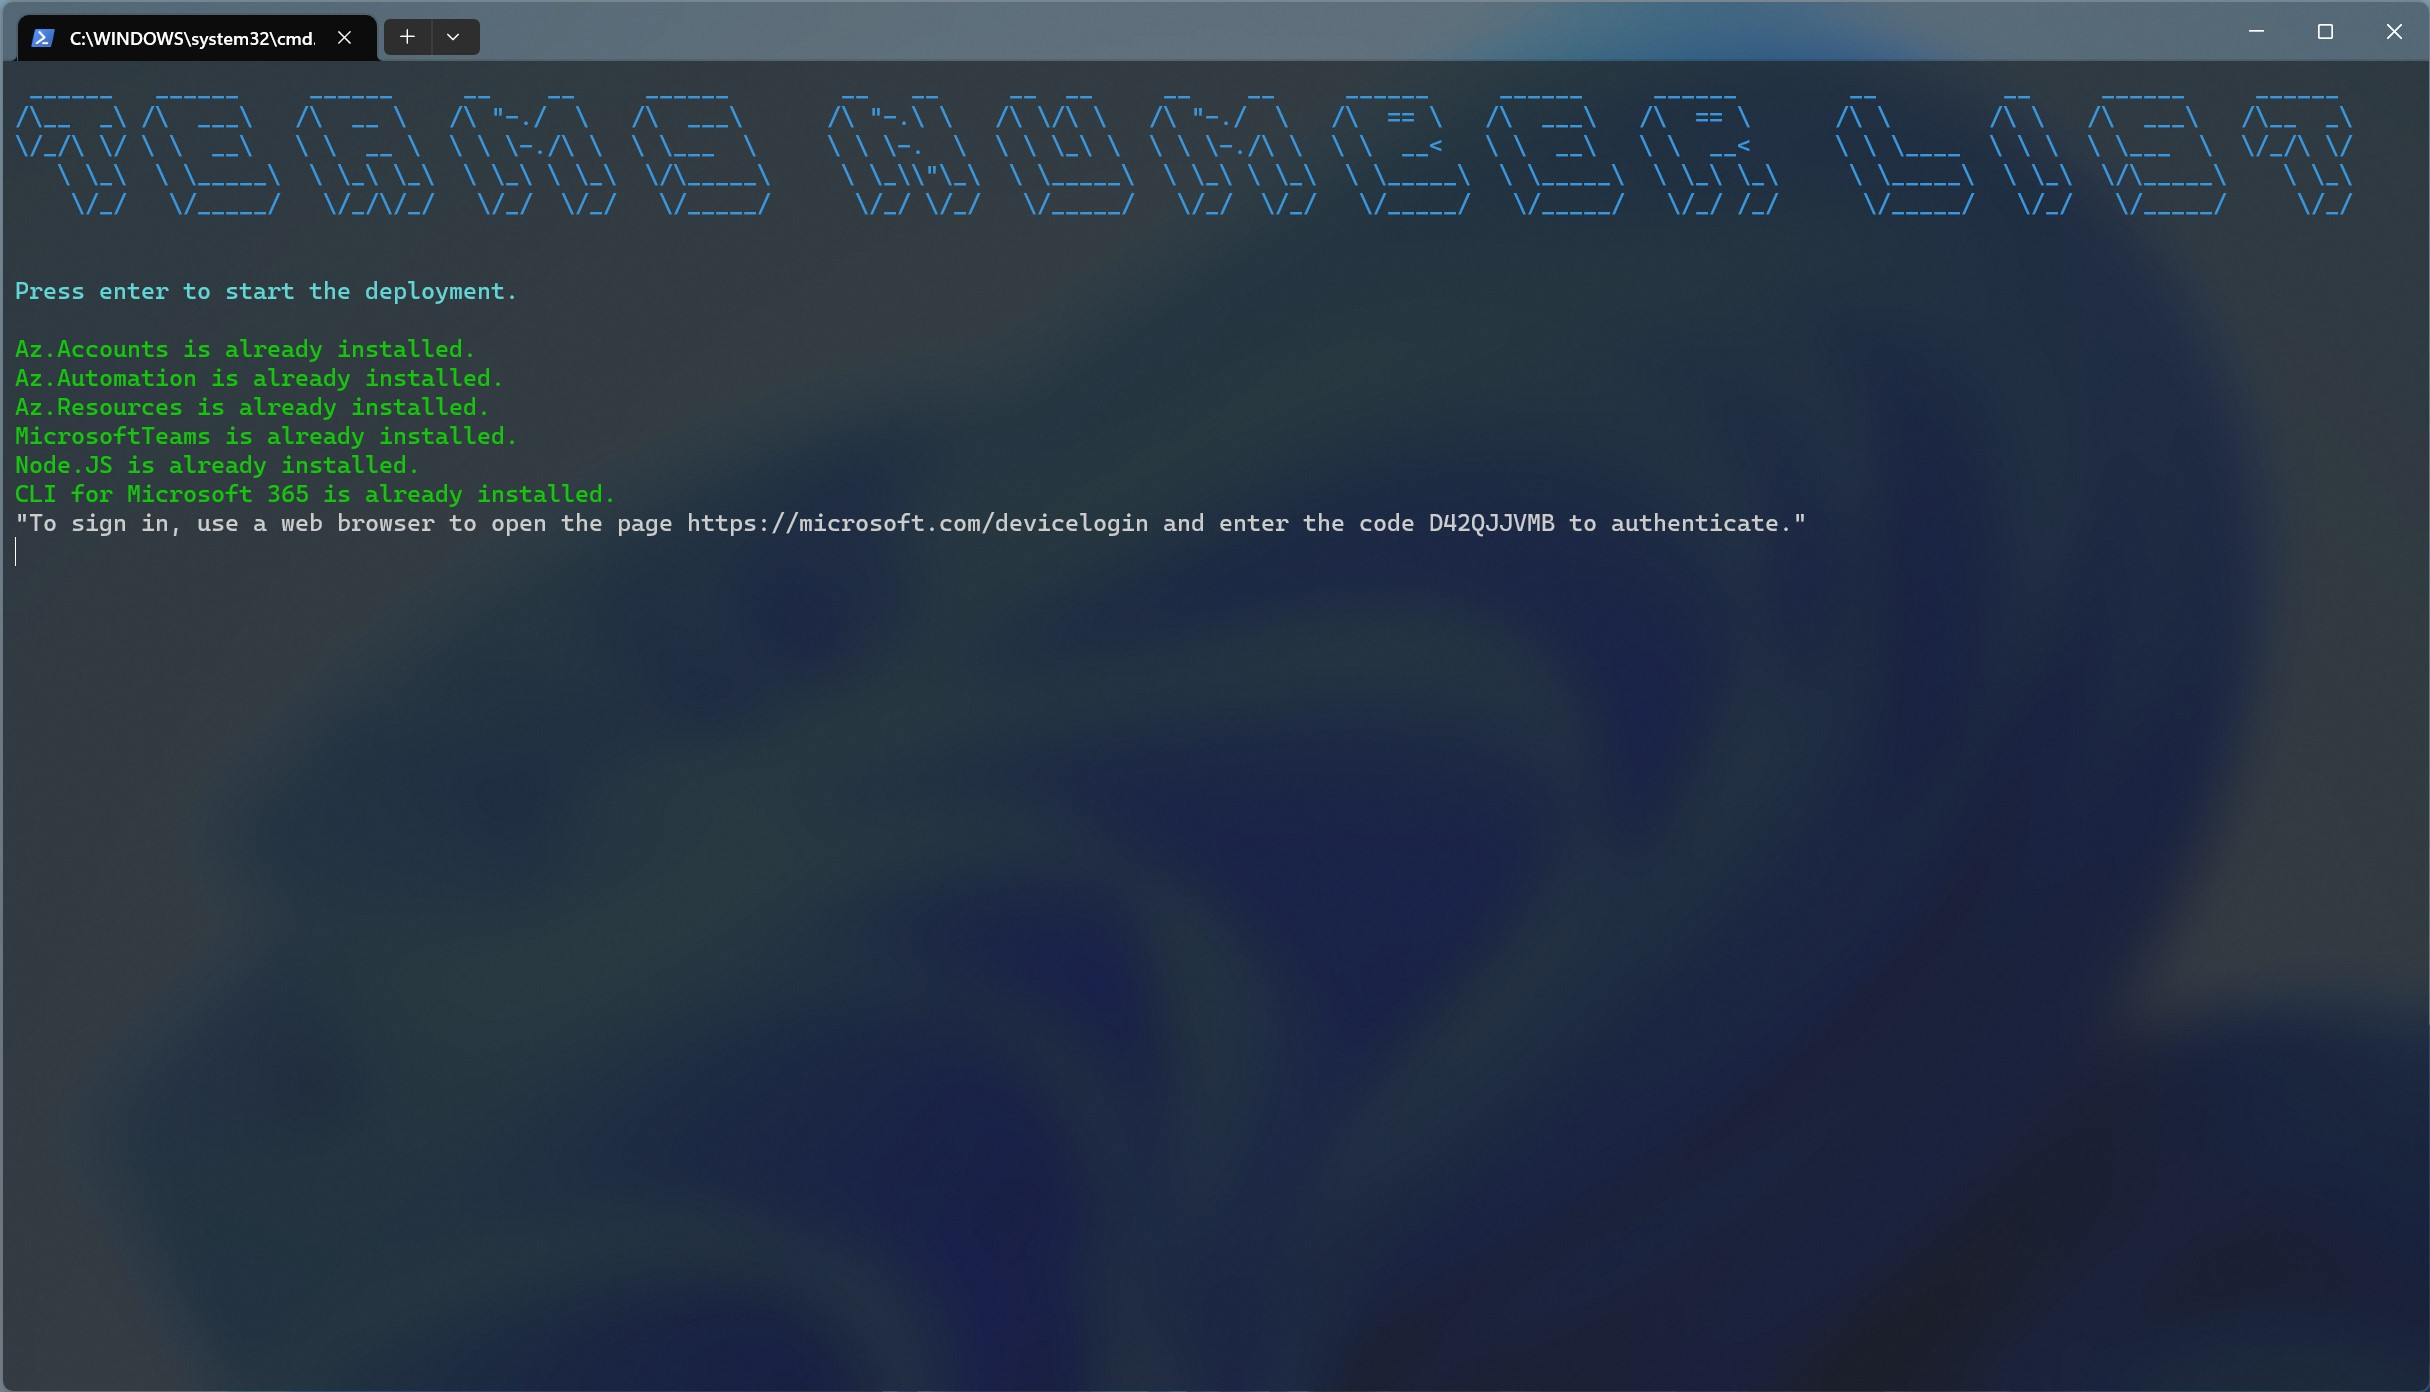
After all the module and components checks have been completed or the missing components have been installed, you will be prompted to sign into the M365 CLI.
Let me explain what’s going on in the script. Our end goal is to have a SharePoint list. Since we need a script to automatically update the list anyway, we might as well just create the list through PowerShell and Microsoft Graph instead of creating it manually.
To provision all this stuff, we need a couple of Az.* PowerShell modules. We also need Node.JS so we can install the CLI for Microsoft 365 through NPM (Node Package Manager). If you miss any of the components on your machine, they will automatically be installed, if you can provide local admin rights.
Azure AD App Registration & Service Principal
The M365 CLI will create a new Azure AD App Registration and a Service Principal. It will also assign the Microsoft Graph permission scopes we need to create and modify SharePoint lists and manage Microsoft Teams to the Service Principal.
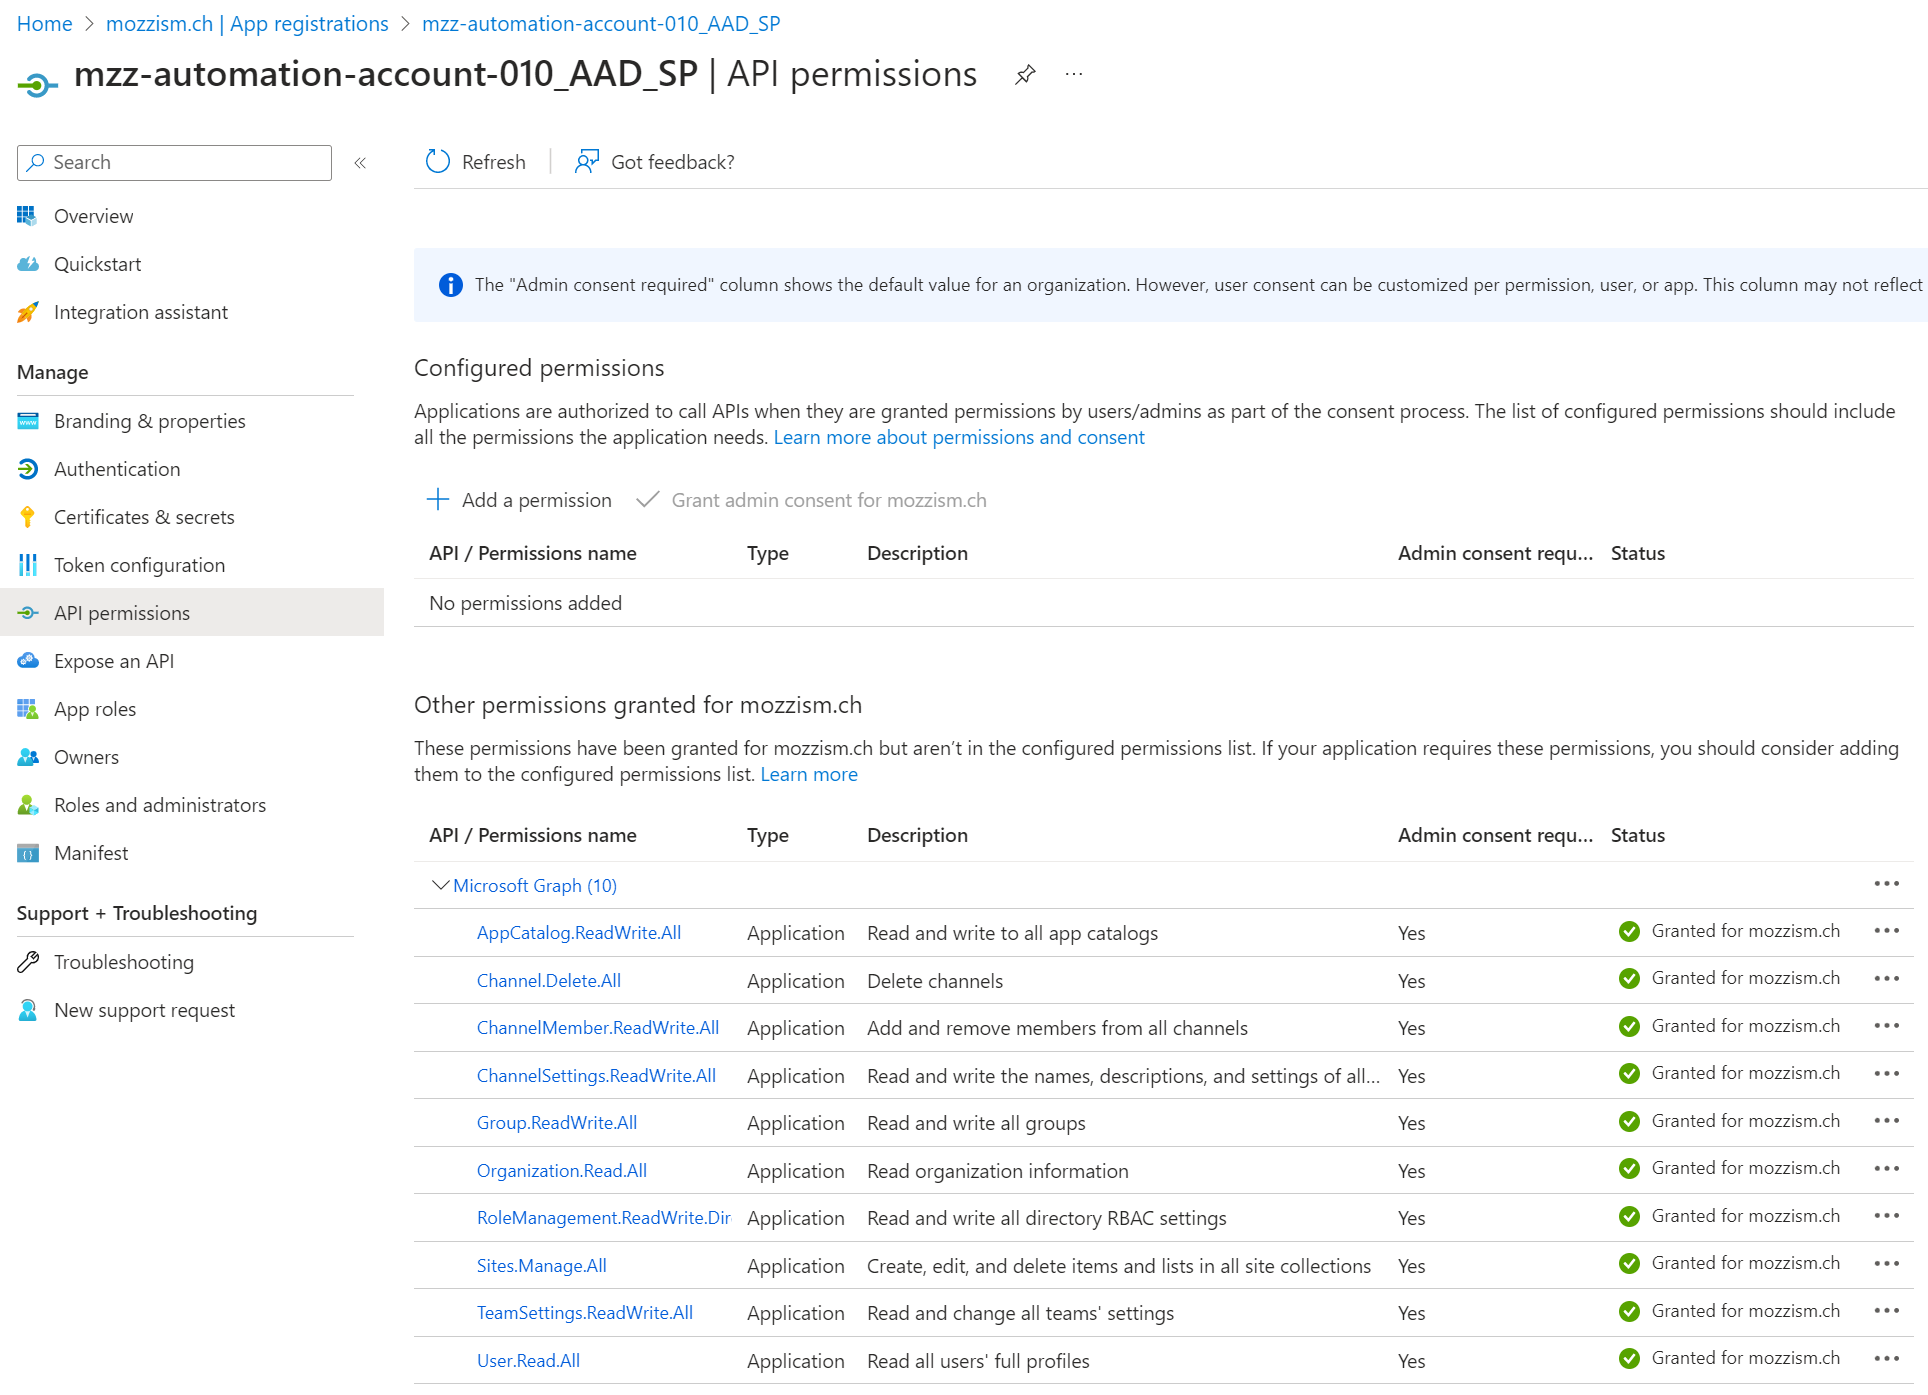
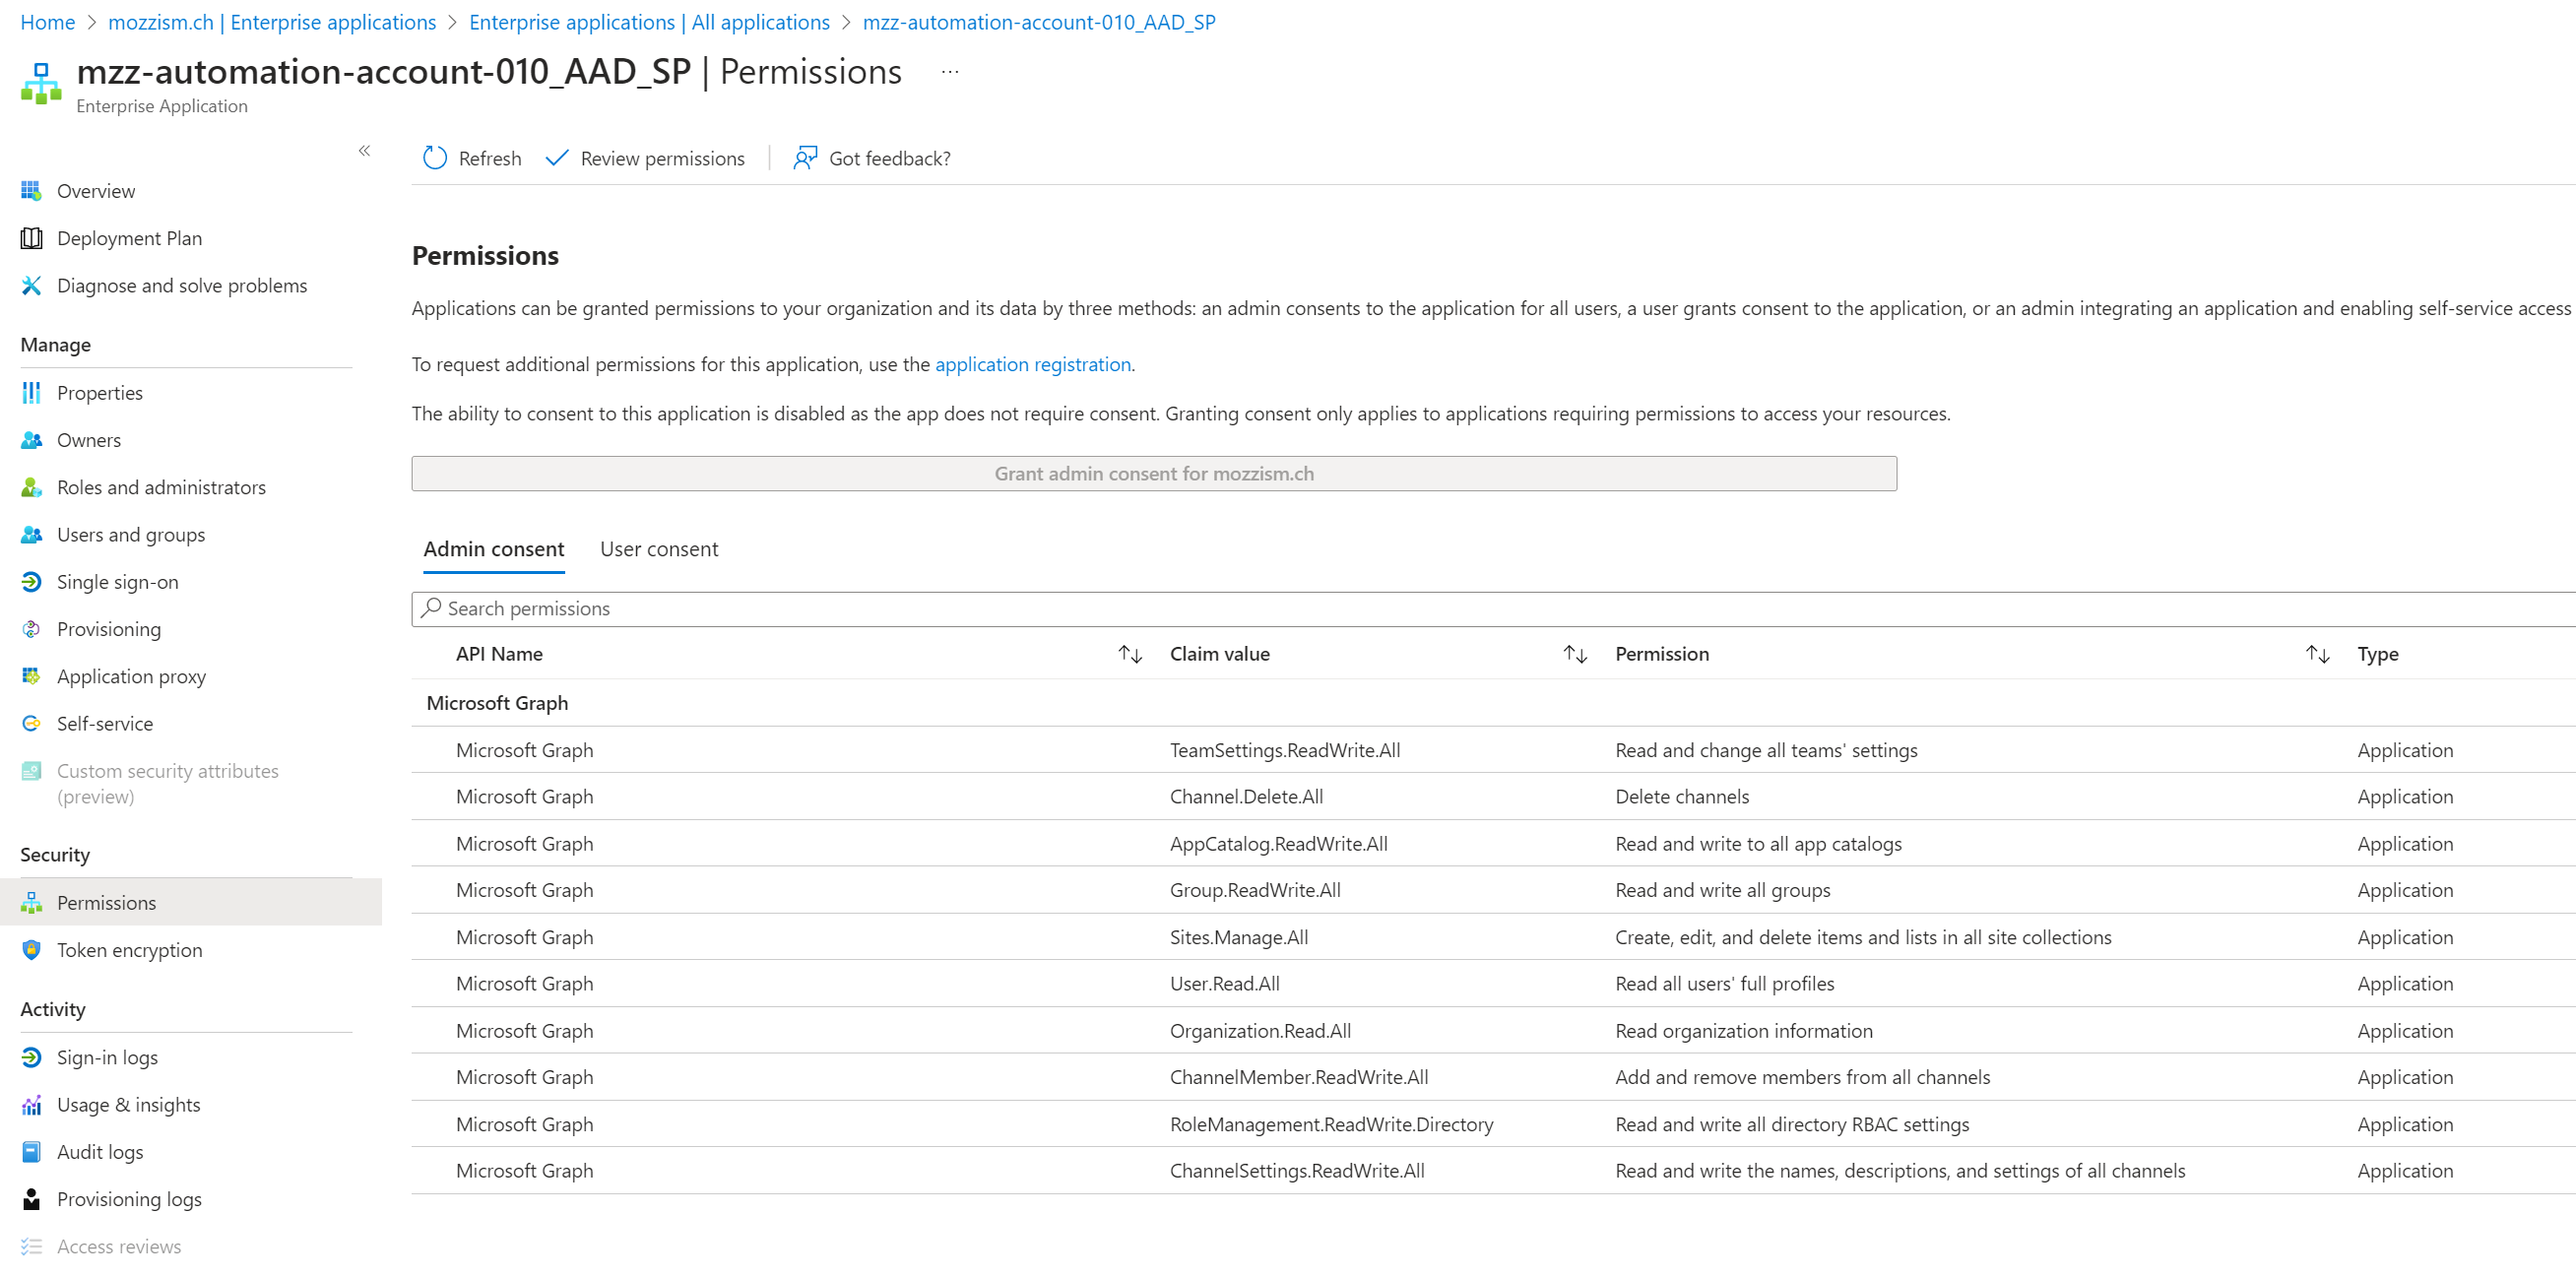
Both the App Registration and the Service Principal will use the name of the Automation Account. This way it’s easy to know where the assigned permissions are used within Azure.

The script also creates a new client secret for the App Registration.
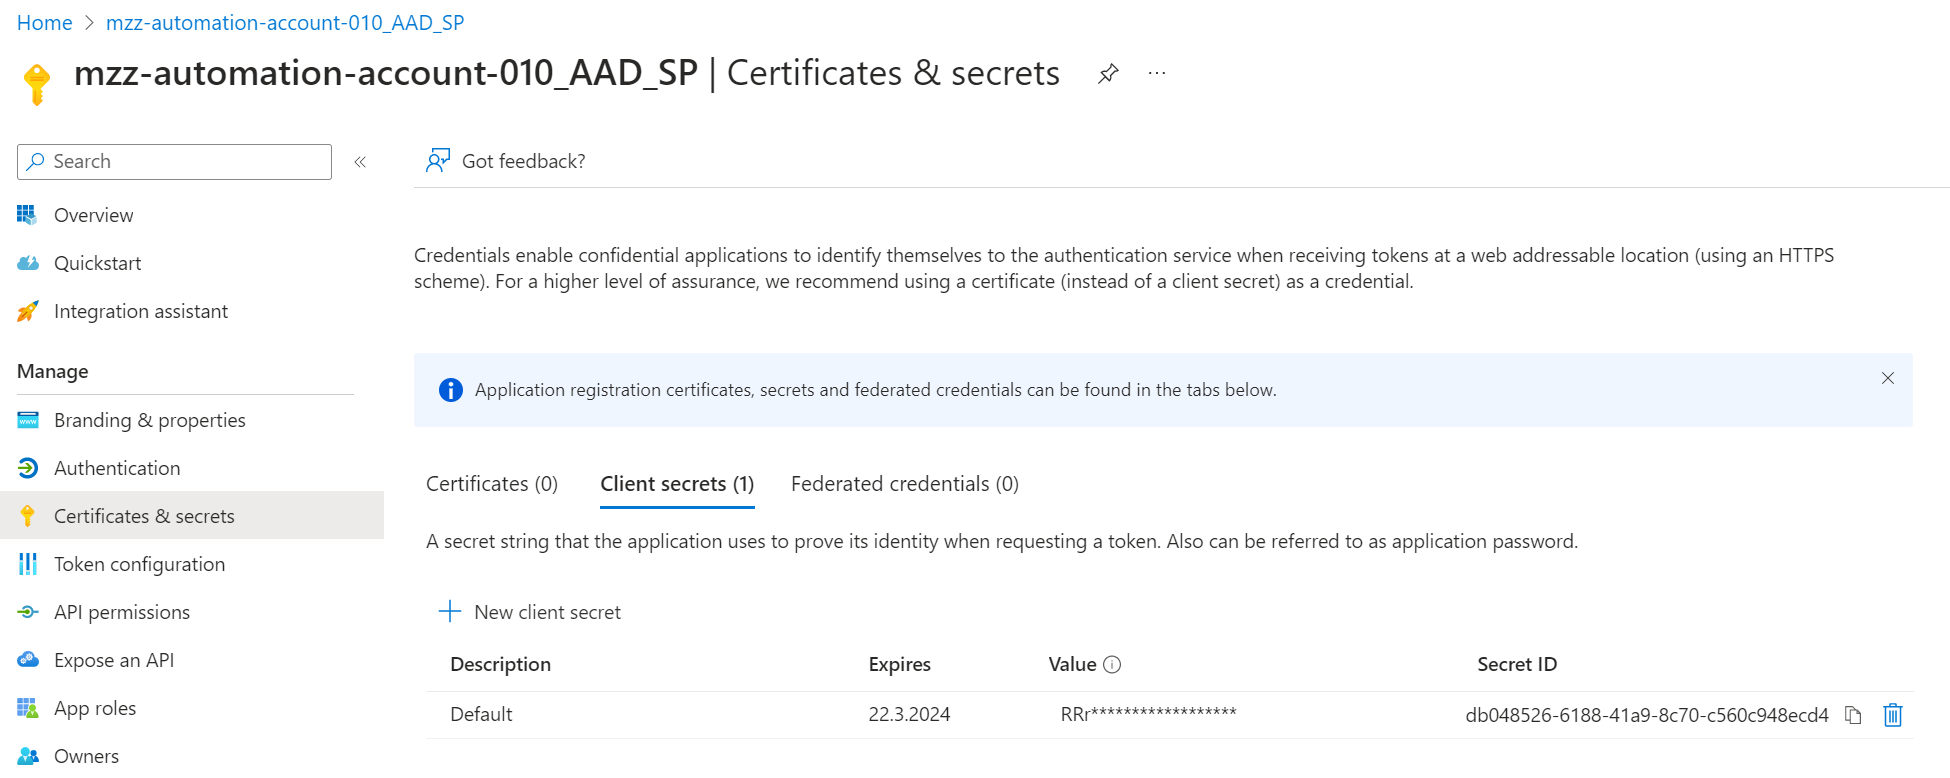
Remember, a client secret can only be viewed once, after it has been created in the portal. Because we used the CLI to create it, we can’t view it in the portal anymore. The secret is received by the script and saved in an encrypted state though. You’ll also be prompted if you want to view it in case you want to copy and store it in a safe place.

You don’t have to do this if you don’t want to. You can always decrypt it again, as long as you’re using the same machine and user account which encrypted it. The secret is saved to .\.local\AppSecret.txt .
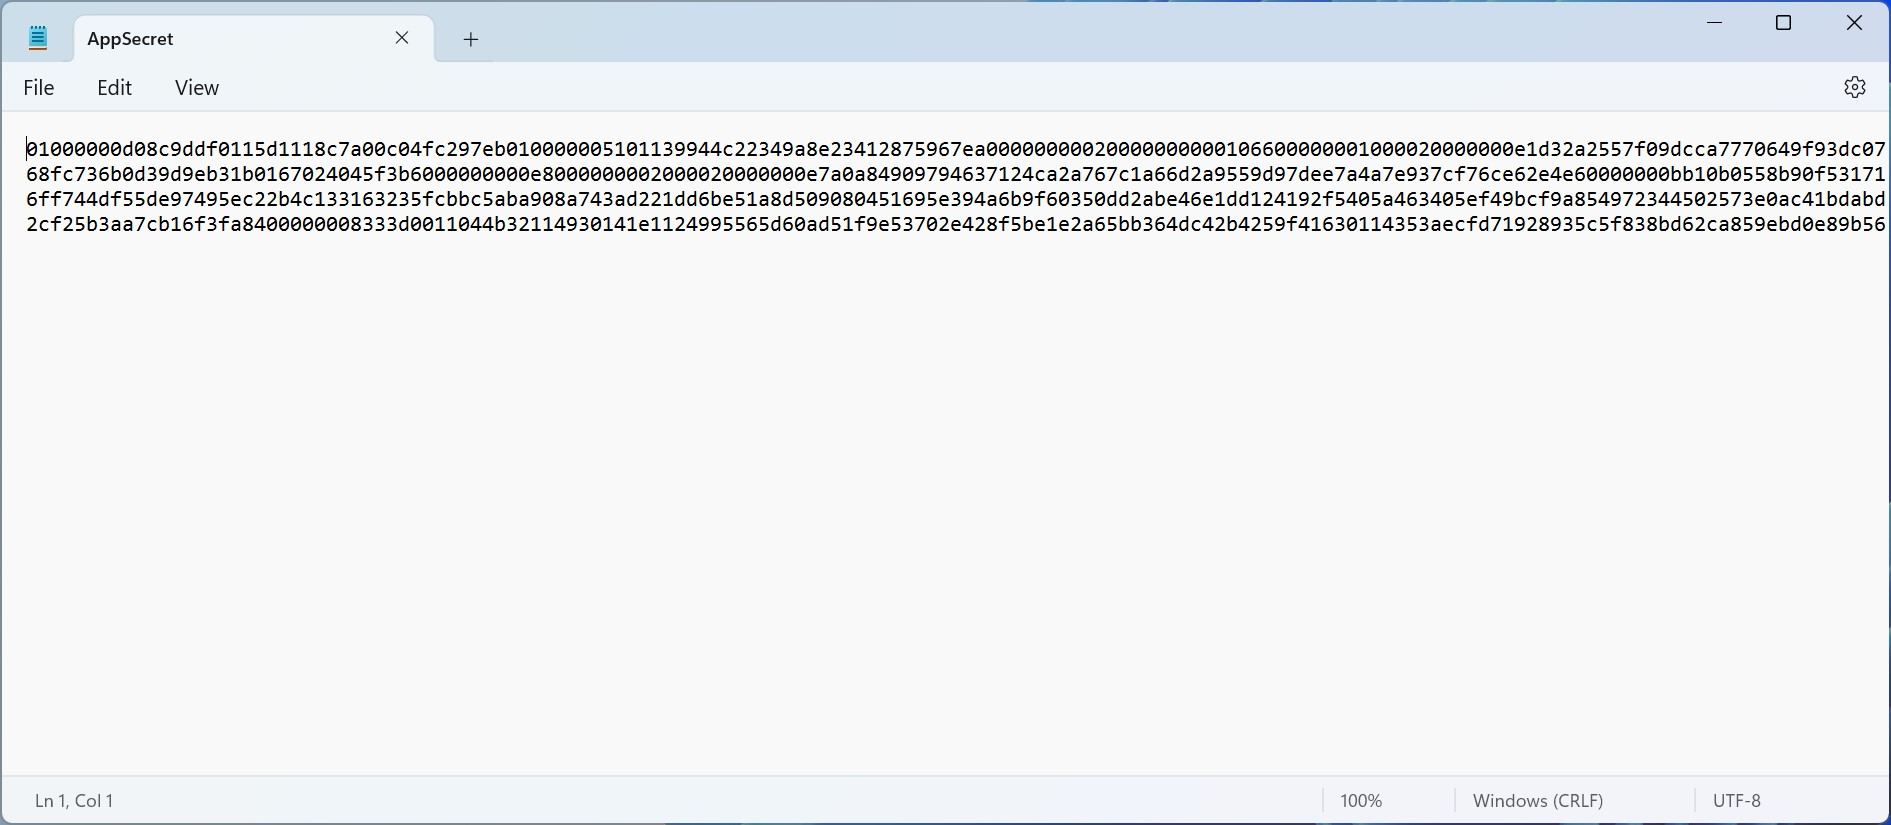
If you want to manually decrypt it later, you can use the following code.
$AppSecret = [Runtime.InteropServices.Marshal]::PtrToStringAuto([Runtime.InteropServices.Marshal]::SecureStringToBSTR((Get-Content -Path .\.local\AppSecret.txt | ConvertTo-SecureString))) | Out-String
Again, you don’t have to if you don’t want to. The script will be able to decrypt the secret and upload it to the Azure Automation Account once it’s needed.
Once the permissions have been assigned to the Service Principal, the script uses the same Service Principal to connect to Microsoft Graph and assign the Skype for Business Administrator role to itself.
This is possible because the M365 CLI previously assigned the scope RoleManagement.ReadWrite.Directory to the Service Principal.
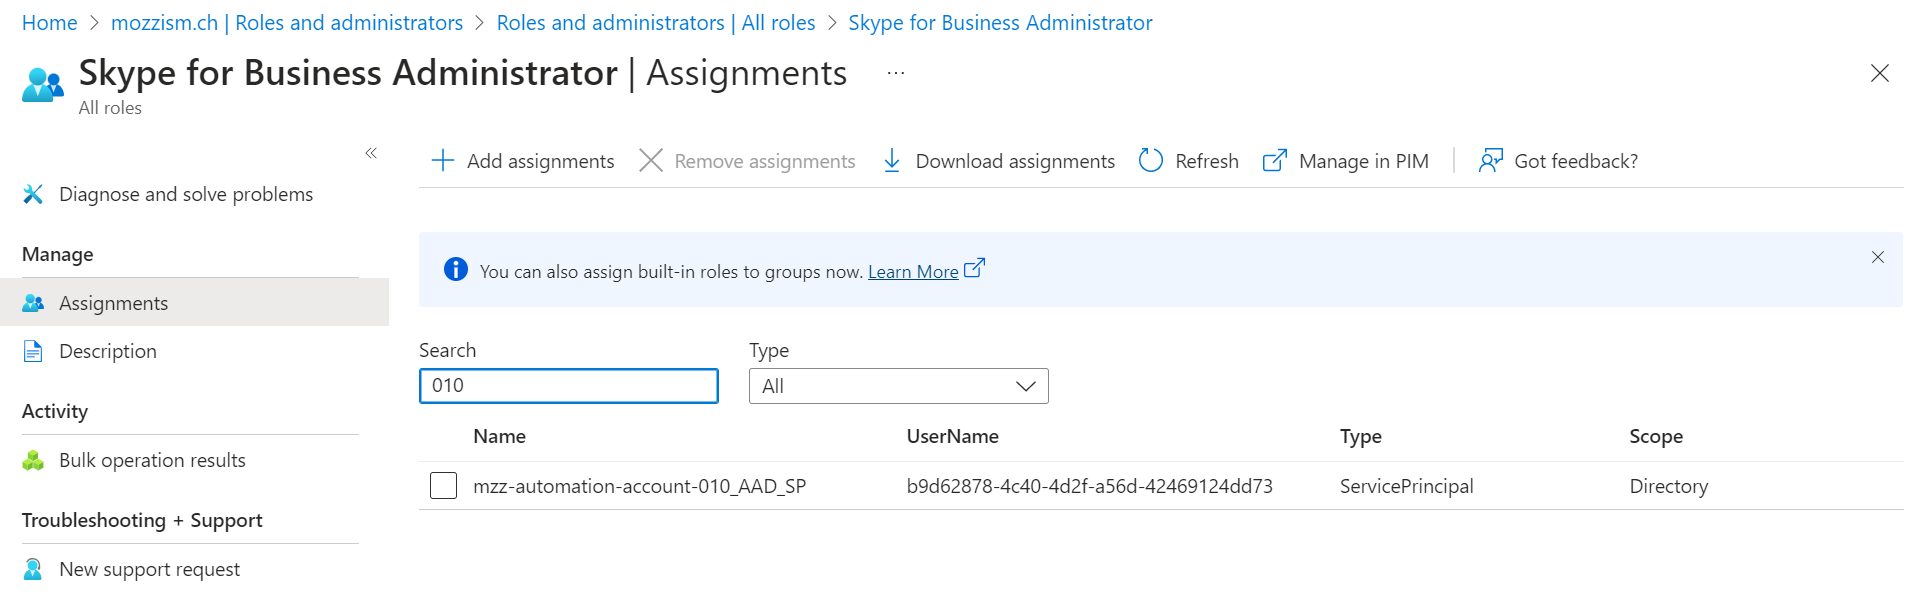
The role is needed for the SP to be able to manage Microsoft Teams via PowerShell. I learned this from Christian Frohn’s excellent blog article.
In case you’re wondering why no Microsoft.Graph modules are required; this is because I chose to work with PowerShell native Invoke-RestMethod commands instead of the *Mg* Cmdlets.
Provisioning the Azure Resources
The previous steps complete rather fast. The next steps are going to take a bit longer. First you need to sign in with an Account which has the appropriate permissions to create Azure resources within your subscription.
I guess it would have been possible to also assign some RBAC roles to the Service Principal which would allow us to use it to sign into Azure as well. Since the script is run locally on demand, I see no problem with using a normal user account for this part. It actually gives us time to review the created App Registration and Service Principal before the script starts to deploy any resources to Azure. Furthermore, we don’t need to worry about being aware of yet another Service Principal which has permissions to deploy or remove Azure Resources.
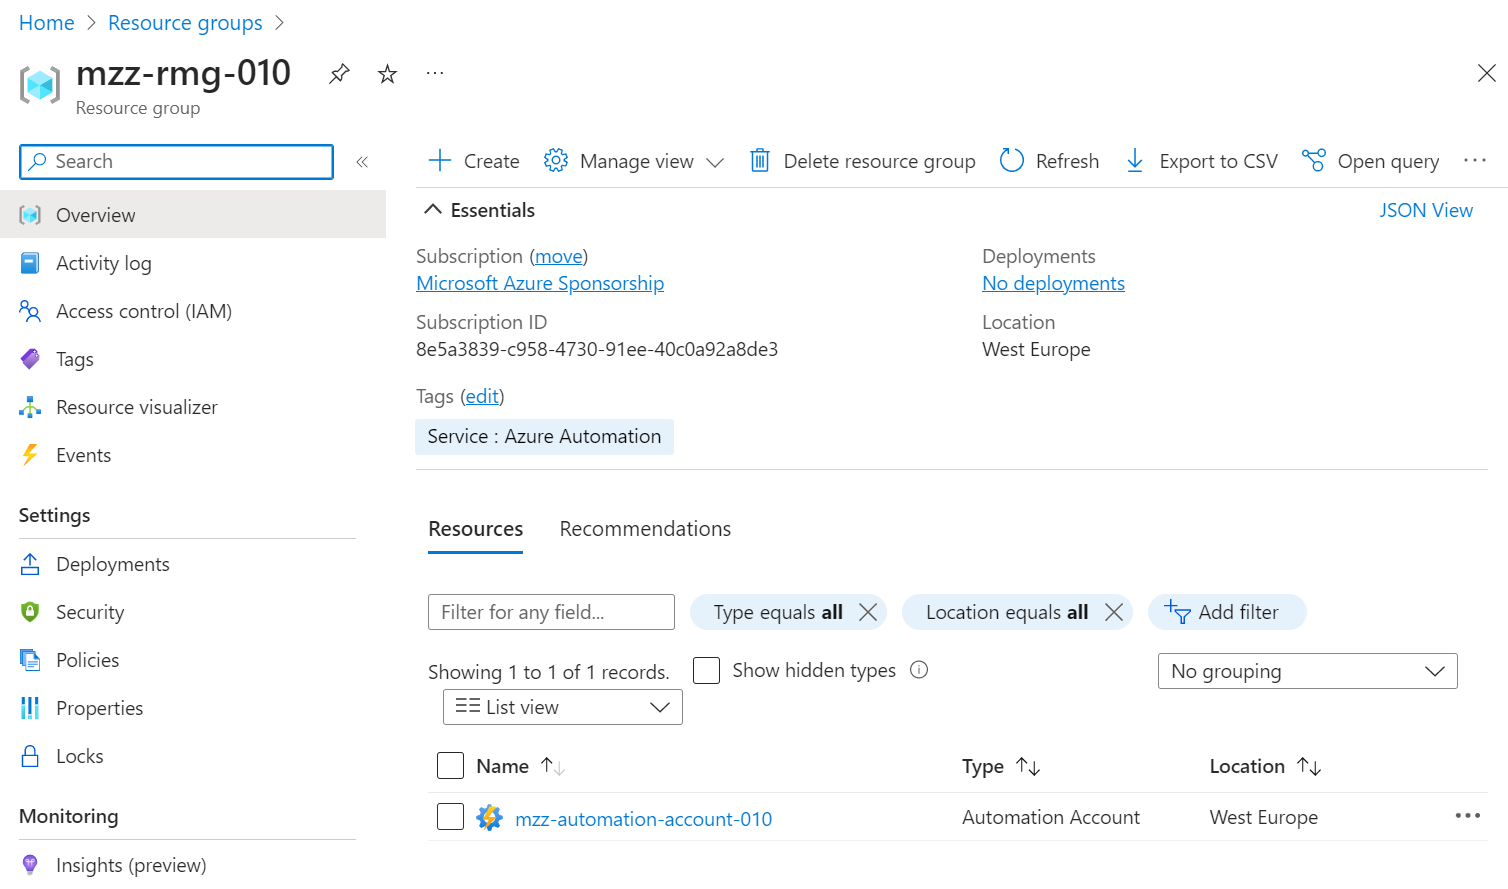
The script will create a Resource Group with the name and location defined in Environment.json.

It will also create a new Automation Account within the Resource Group, also in the same region.
Automation Account
Modules
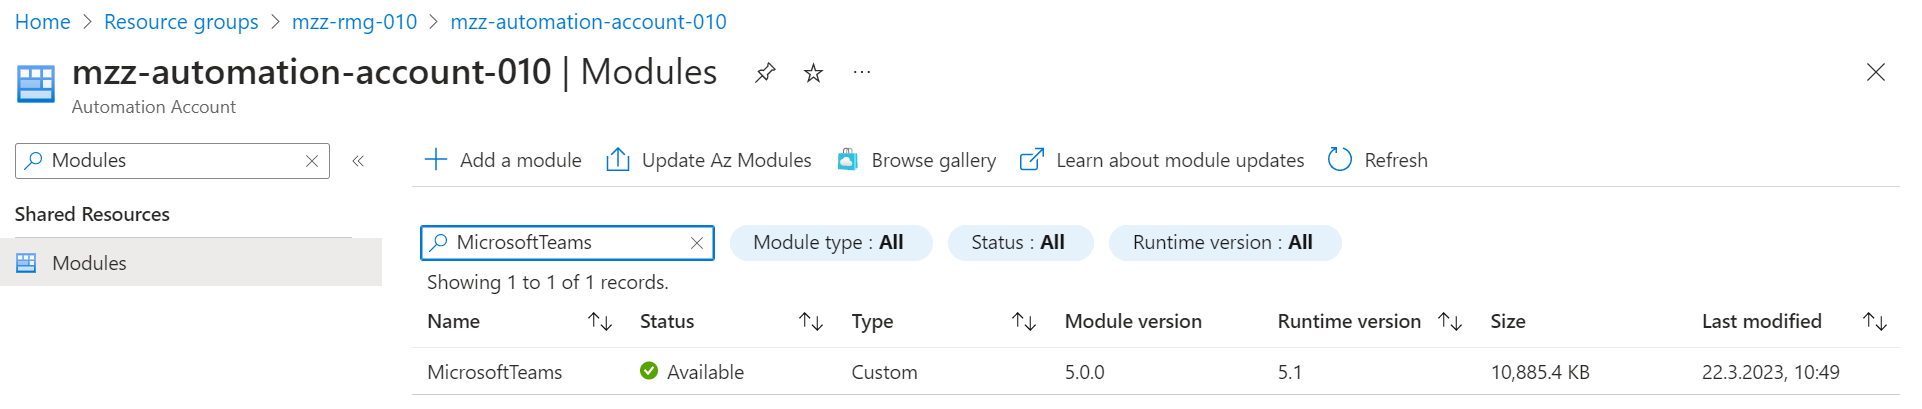
The MicrosoftTeams Module is not added to Automation Accounts by default. Thus, the script needs to add it. This usually takes a couple of Minutes.
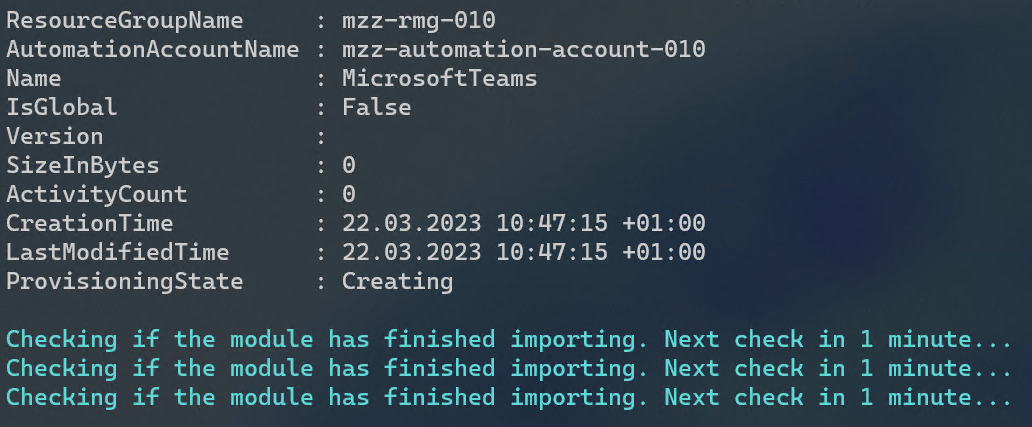
Once the module has finished importing, the script will continue.
Variables
The main script which will create/update our SharePoint List needs access to all the data we initially defined in Environment.josn. This information is stored in Automation Variables which can be accessed through Azure Runbooks.
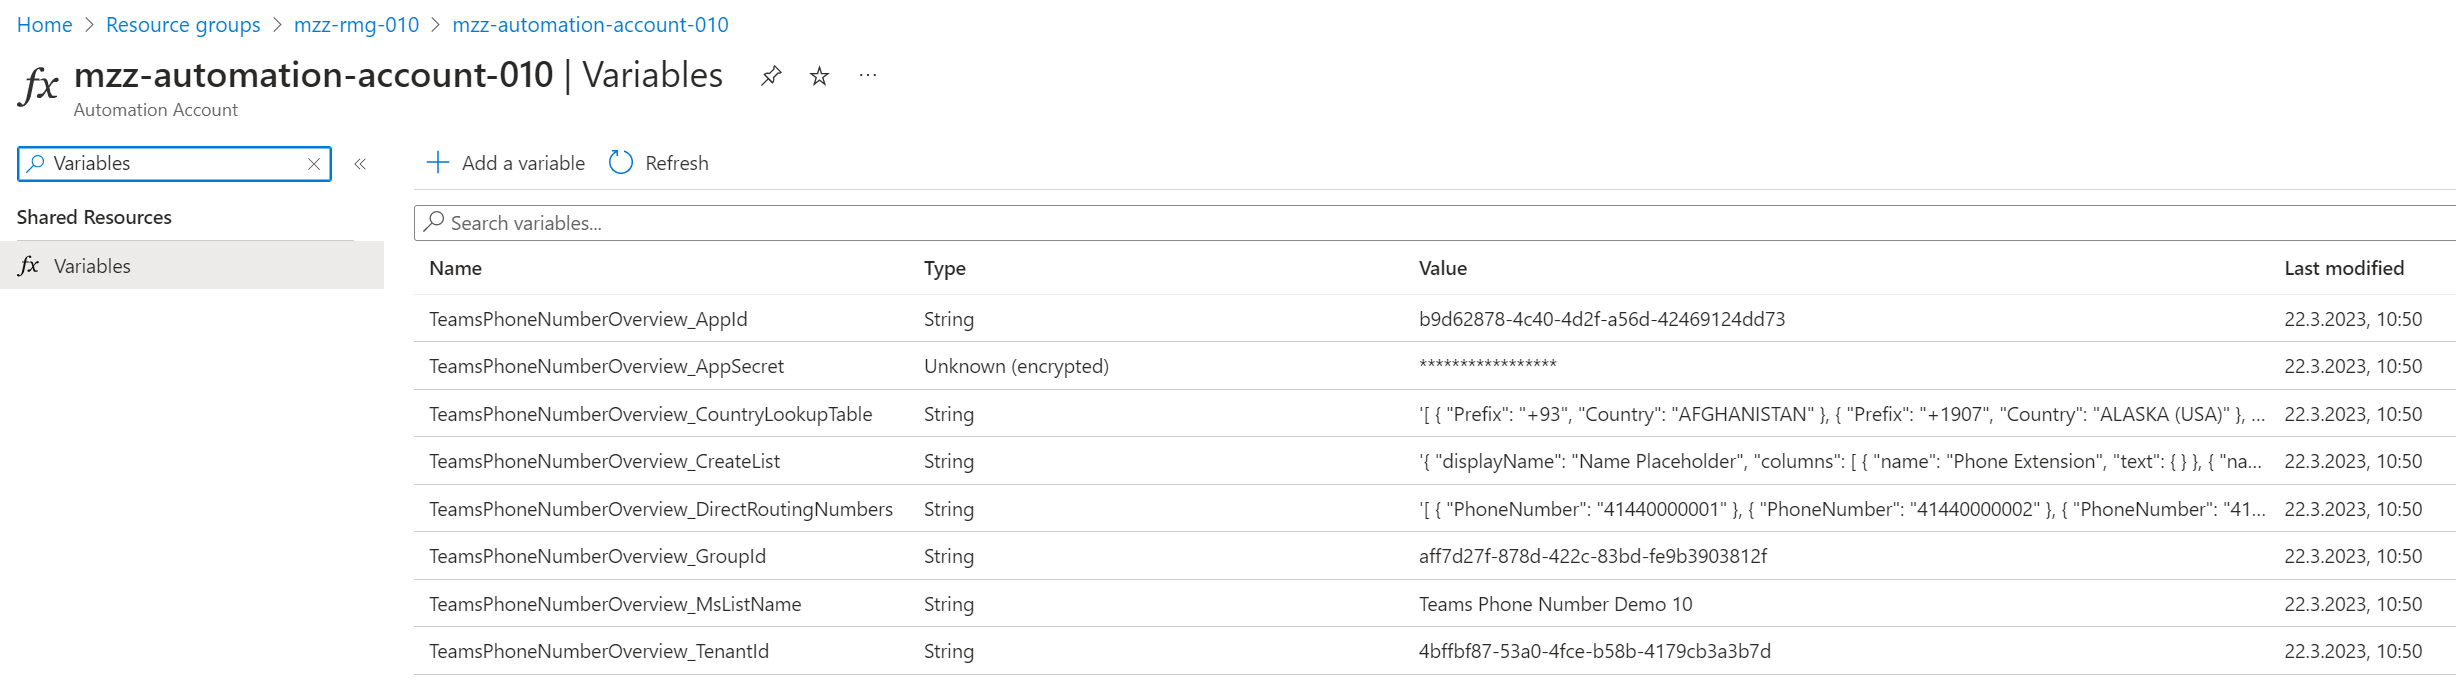
The client secret is stored as an encrypted variable and cannot be viewed or edited. Its content can only be accessed by using the internal Cmdlet Get-AutomationVariable .
We can also see that we have a variable called TeamsPhoneNumberOverview_DirectRoutingNumbers. This variable stores all Direct Routing numbers in Json format. Because I ran into some issues with storing the Json content as a string, I needed to get creative and enclose it in single quotes: '{"Json": "Example"}' . These get removed when the variable is imported through the Runbook so that the Json can be converted to a PowerShell object.
TeamsPhoneNumberOverview_CountryLookupTable contains a list with all countries and prefixes to determine the country of Direct Routing Numbers. To be consistent, this is also applied to Calling Plan and Operator Connect numbers, even though this information would be available through Get-CsPhoneNumberAssignment .
If you would like to learn more about these internal Cmdlets for Automation Variables or Azure Runbooks in general, I recommend this article of mine.
Runbooks
We also have a couple of Runbooks which were deployed by the Setup.ps1 script. The main script logic sits in TeamsPhoneNumberOverview.
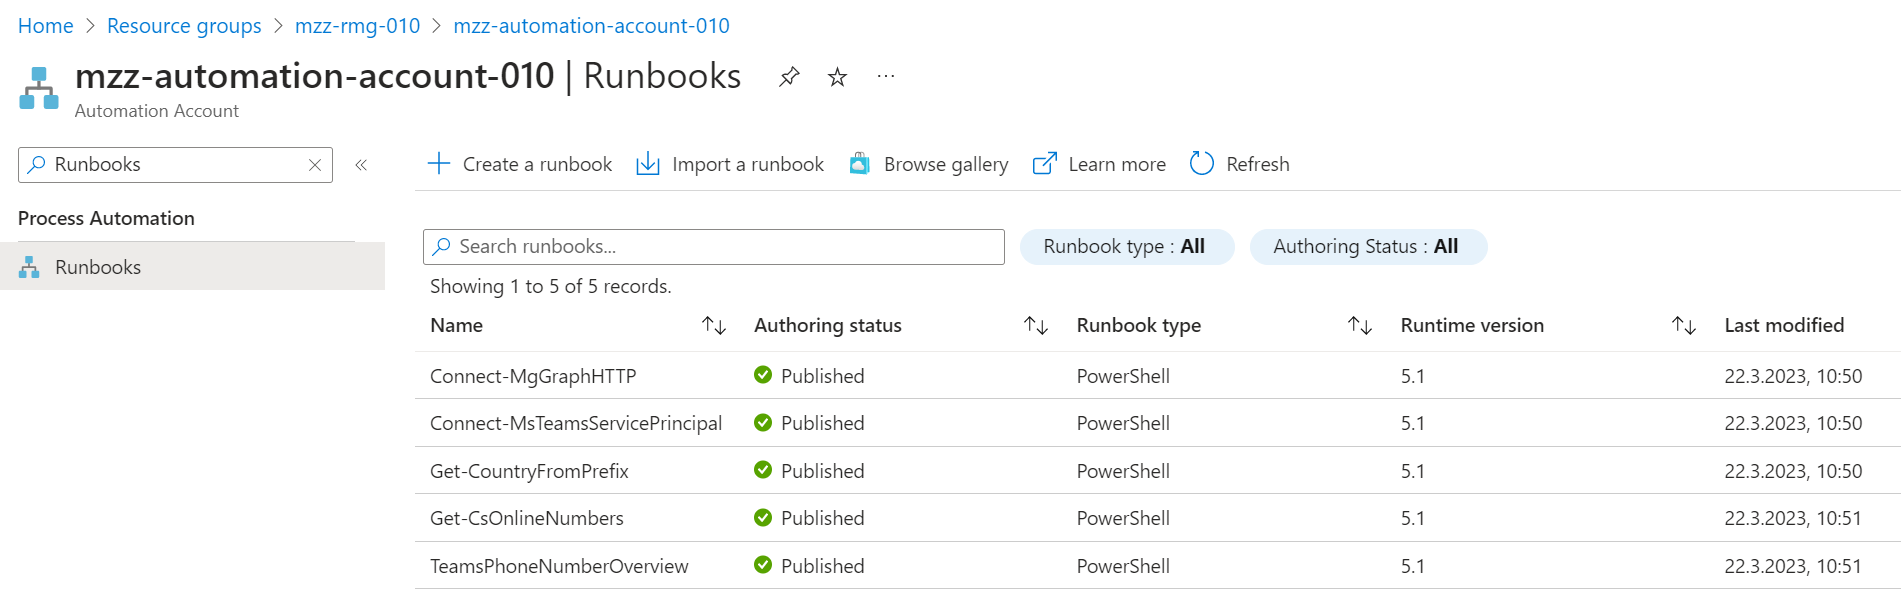
To make the solution more modular some functions, like Connect-MgGraphHTTP or Connect-MsTeamsServicePrincipal are stored in separate Runbooks. This makes it easier to reuse them and means less work if we want to extend the Automation Account with other scripts.
For example, if you have another Runbook in the same Automation Account which needs to connect to MicrosoftTeams PowerShell as well, you can just use the following code.
. .\Connect-MsTeamsServicePrincipal.ps1
$TenantId = Get-AutomationVariable -Name “TeamsPhoneNumberOverview_TenantId”
$AppId = Get-AutomationVariable -Name “TeamsPhoneNumberOverview_AppId”
$AppSecret = Get-AutomationVariable -Name “TeamsPhoneNumberOverview_AppSecret”
. Connect-MsTeamsServicePrincipal -TenantId $TenantId -AppId $AppId -AppSecret $AppSecret
And if you ever need to adjust something in the login function, you only need to change it in one script (Connect-MsTeamsServicePrincipal) and not in all your Runbooks.
Script Logic
The code for the main script logic can be found here.
I asked ChatGPT to explain what the script does. The result is astonishing.
This PowerShell script is designed to gather information about Microsoft Teams users who have phone numbers assigned to them, and store this information in a SharePoint list.
The script starts by importing four external functions, which are used later in the script. It then sets some variables by retrieving values from Azure Automation variables. These variables include the name of the SharePoint list where the data will be stored, as well as the credentials needed to connect to the Microsoft Teams and Graph APIs.
Next, the script imports Direct Routing numbers and adds a leading plus sign to all of them. It also retrieves a list of existing SharePoint lists for a specific group ID, and checks if the desired SharePoint list already exists. If it does, the script retrieves its ID. If not, a new SharePoint list is created and its ID is retrieved.
The script then retrieves information about all Teams users who have a phone number assigned to them. For each user, the script determines if they are a user or resource account, and then extracts details about their phone number, such as the phone number itself, any extension, and the country associated with the number. The script also checks if the phone number is a Direct Routing number or a CsOnline number. Finally, it creates an object containing all of this information for each user, and adds this object to an array.
Once all of the user information has been gathered, the script writes it to the SharePoint list. Each object in the array is written to a new row in the list.
The only thing I would have added is to mention that the script only adds new entries to the list, only updates changed entries with the new values and removes entries from the list which no longer exist.
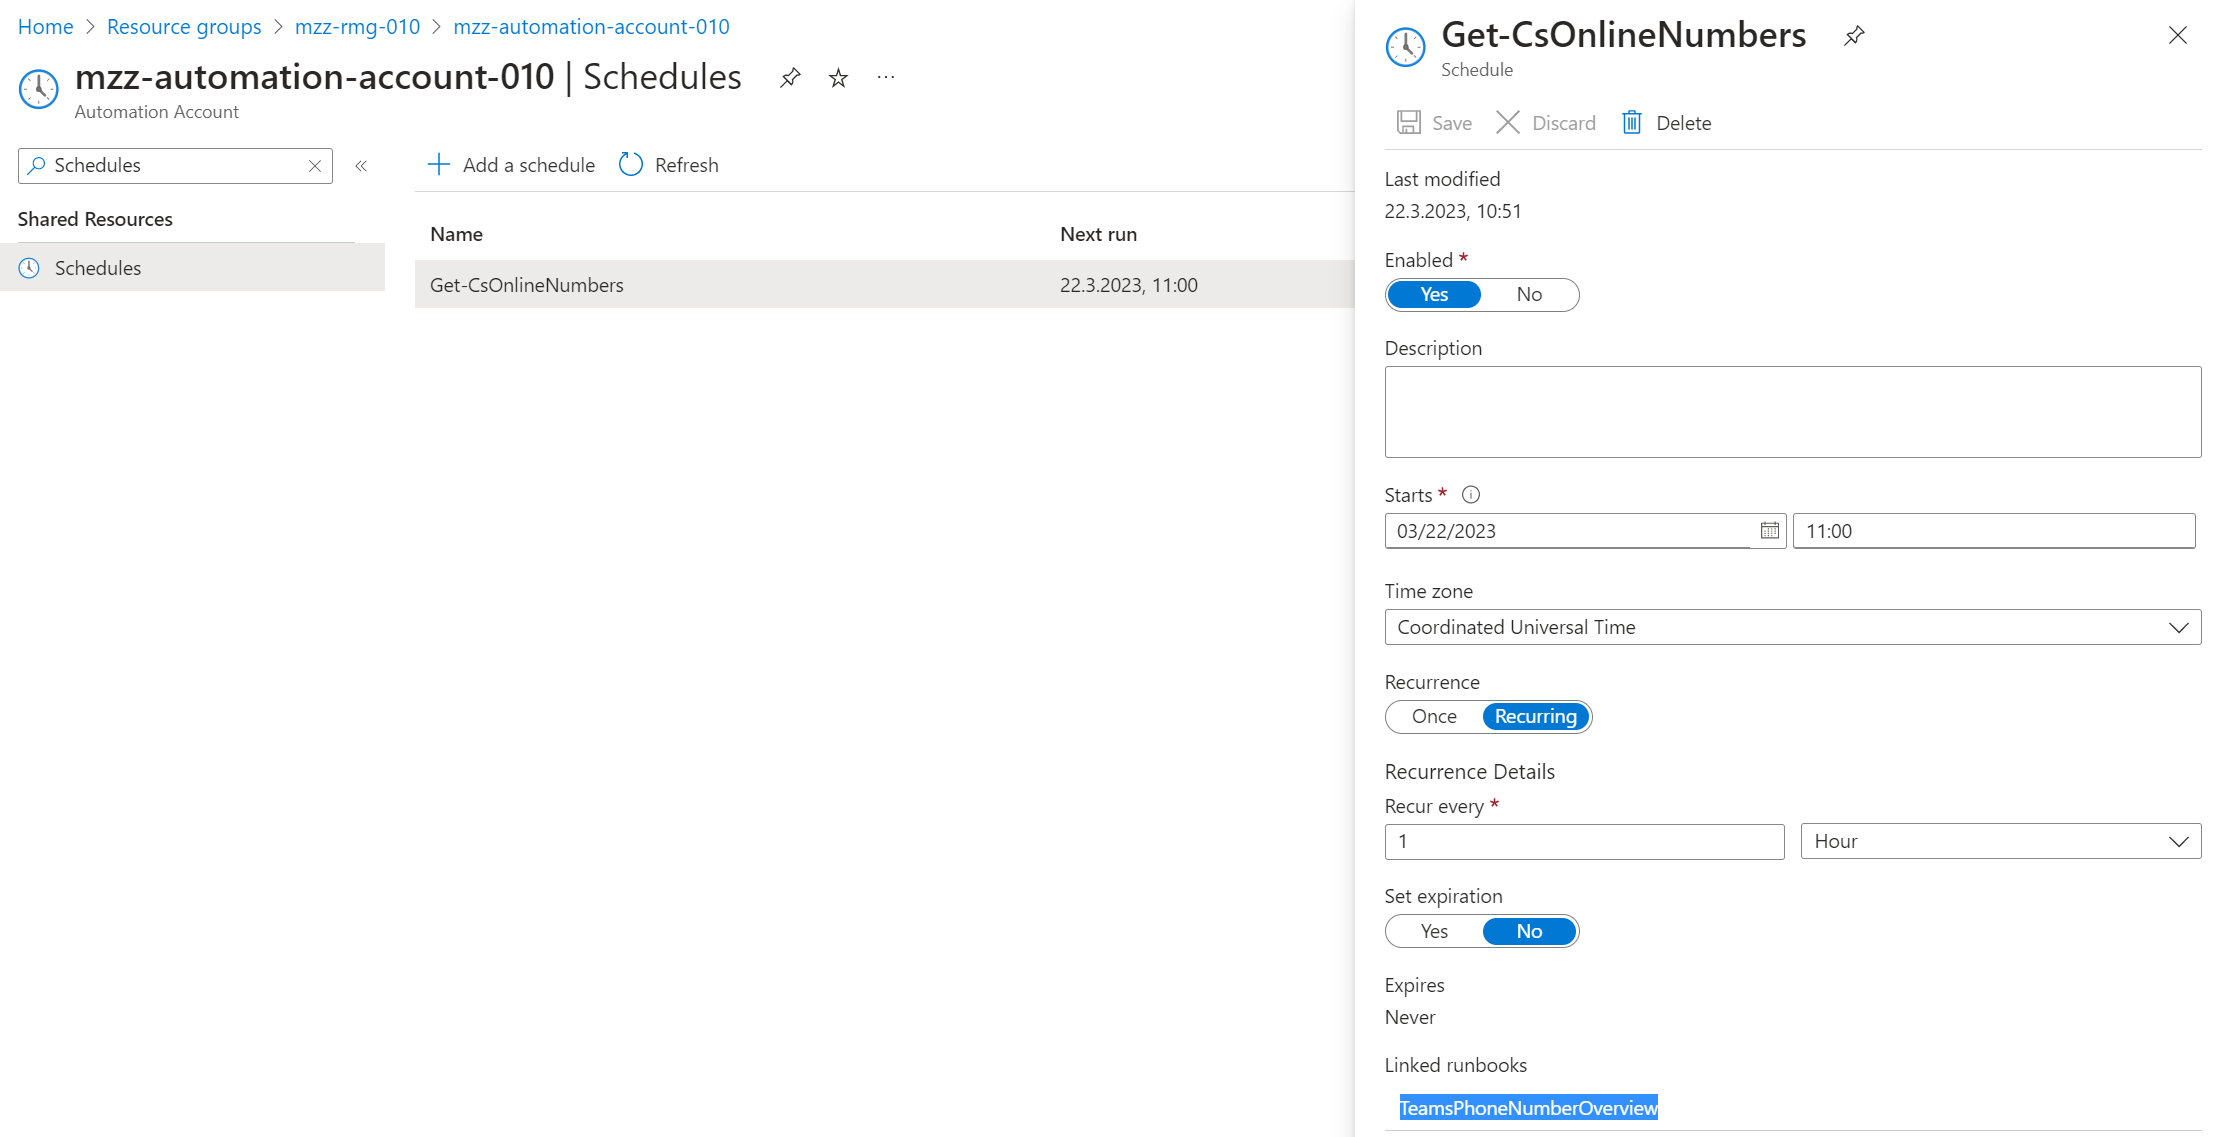
Schedules
The setup script has also created a recurring schedule which runs every hour. The schedule is automatically linked to the TeamsPhoneNumberOverview Runbook by the script. This will result in the SharePoint list being updated once an hour.
That’s it. These are all the resources and components we need to create and update the SharePoint List.
Running the Runbook
The Runbook schedule is configured in UTC. The first start time needs to be at least 5 minutes after the schedule’s creation time. To be sure, I set the schedule to run at the next full hour + 2 hours. In case this does not work for you in your local time zone, please let me know.
This means that the SharePoint List won’t be created straight away. If you want to manually run the Runbook before the first scheduled start, just click on Start.

The job will just take a couple of minutes to complete.

You should then see the newly created List in SharePoint or Microsoft Lists.
Finishing Touches
Unfortunately, the Graph API has some limitations in terms of what types of fields can be added or updated in a list. I wanted to perfect my solution by also having a User Profile column and a link to Teams Admin Center for all assigned user numbers. These types can only be added manually.
Important: For this and the next part, it’s extremely important to follow my instructions very carefully. If the column names don’t match up with the Flow it will not work.
Add Two Additional Columns
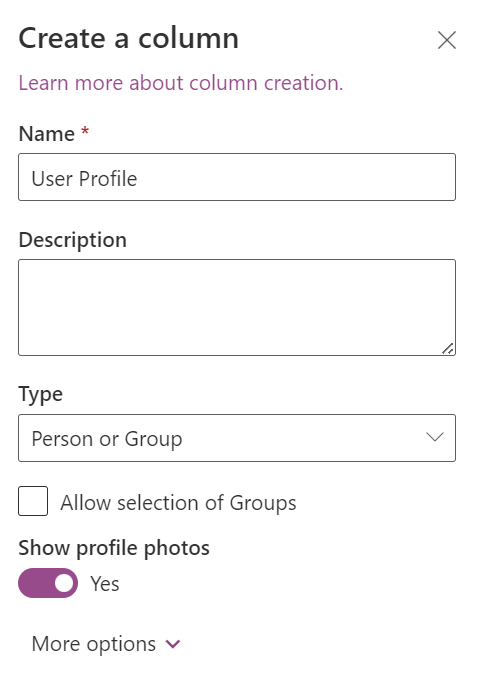
Click on + Add column.
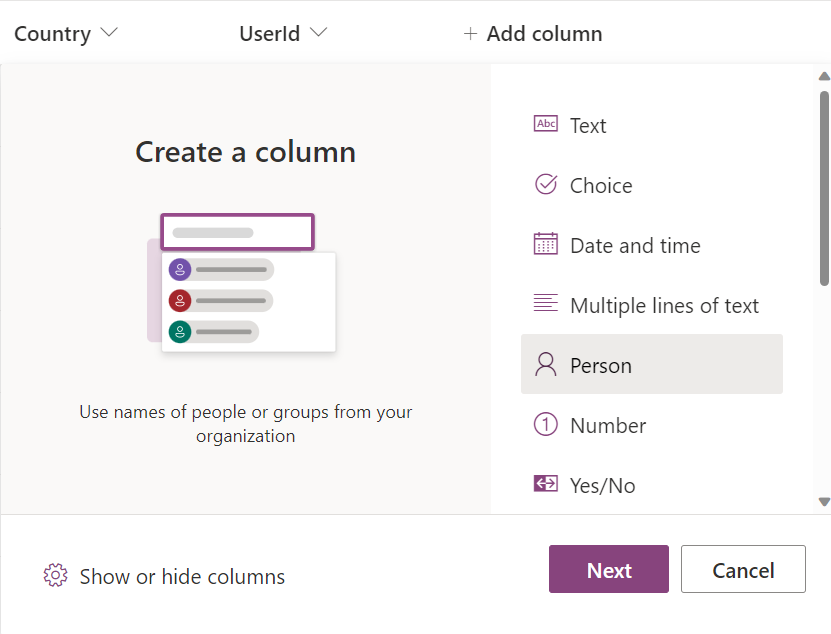
Name the column User Profile and toggle Show profile photos.
Repeat the steps and choose Hyperlink this time.
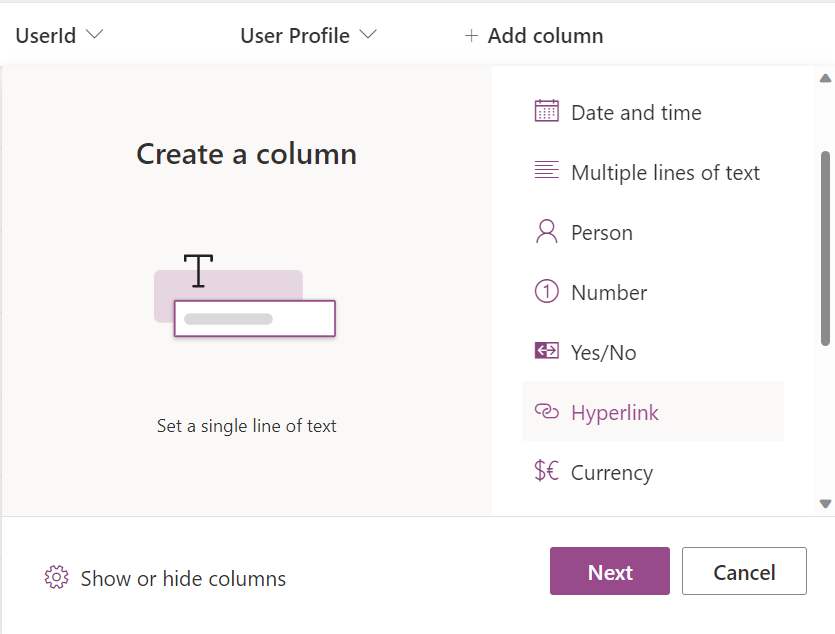
Name this column Teams Admin Center.
Now let’s create the final part of our Number Overview Solution: A Power Automate Flow.
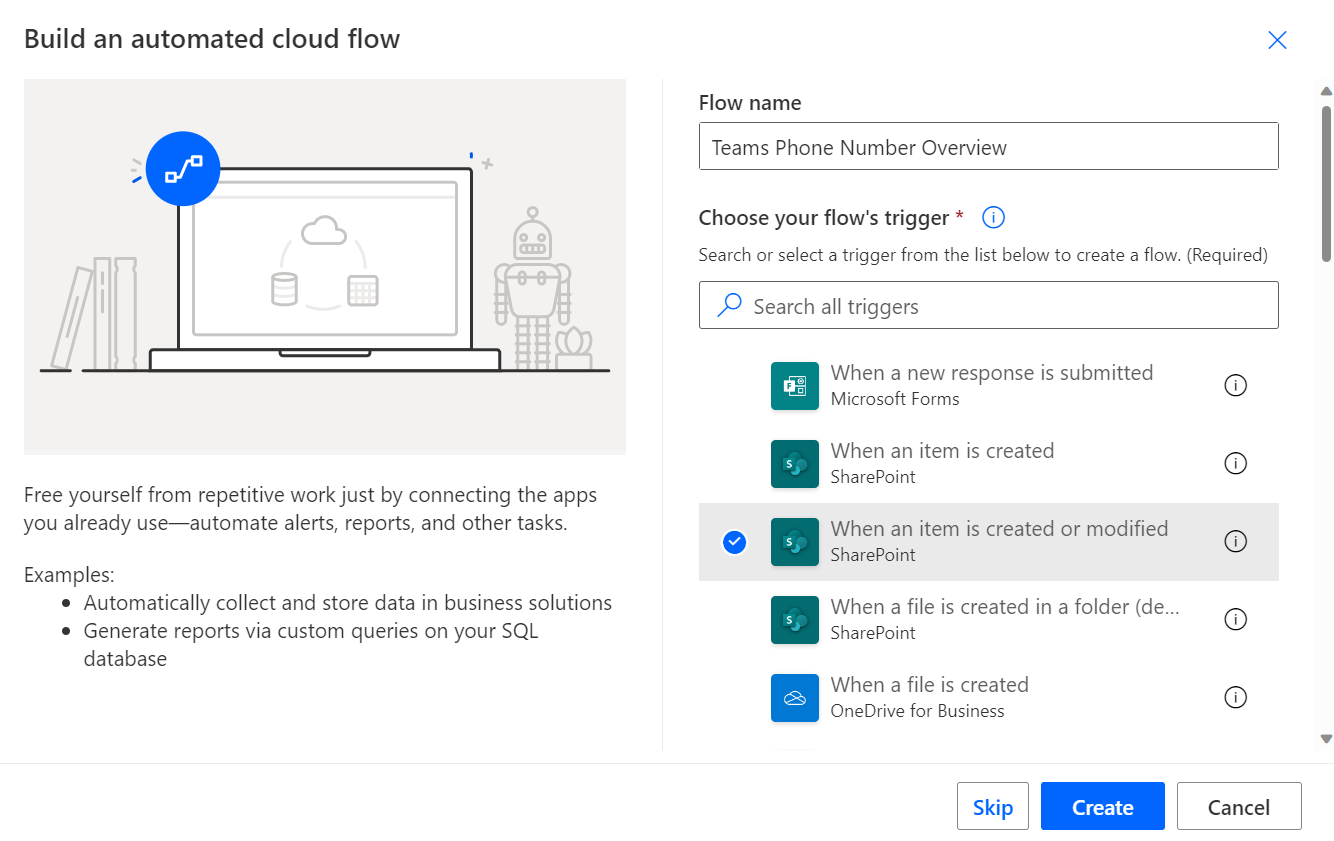
Create The Flow
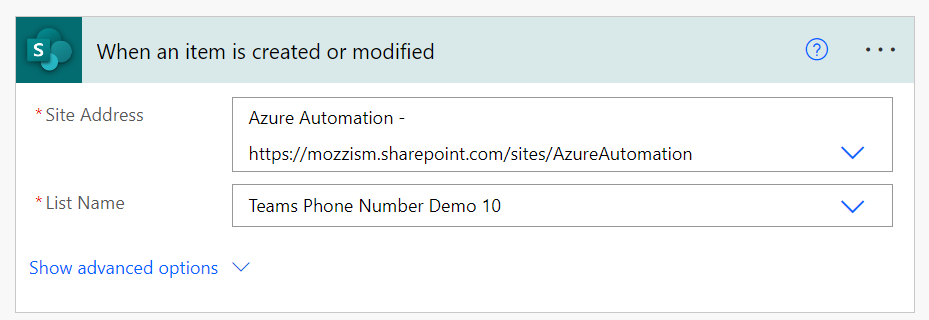
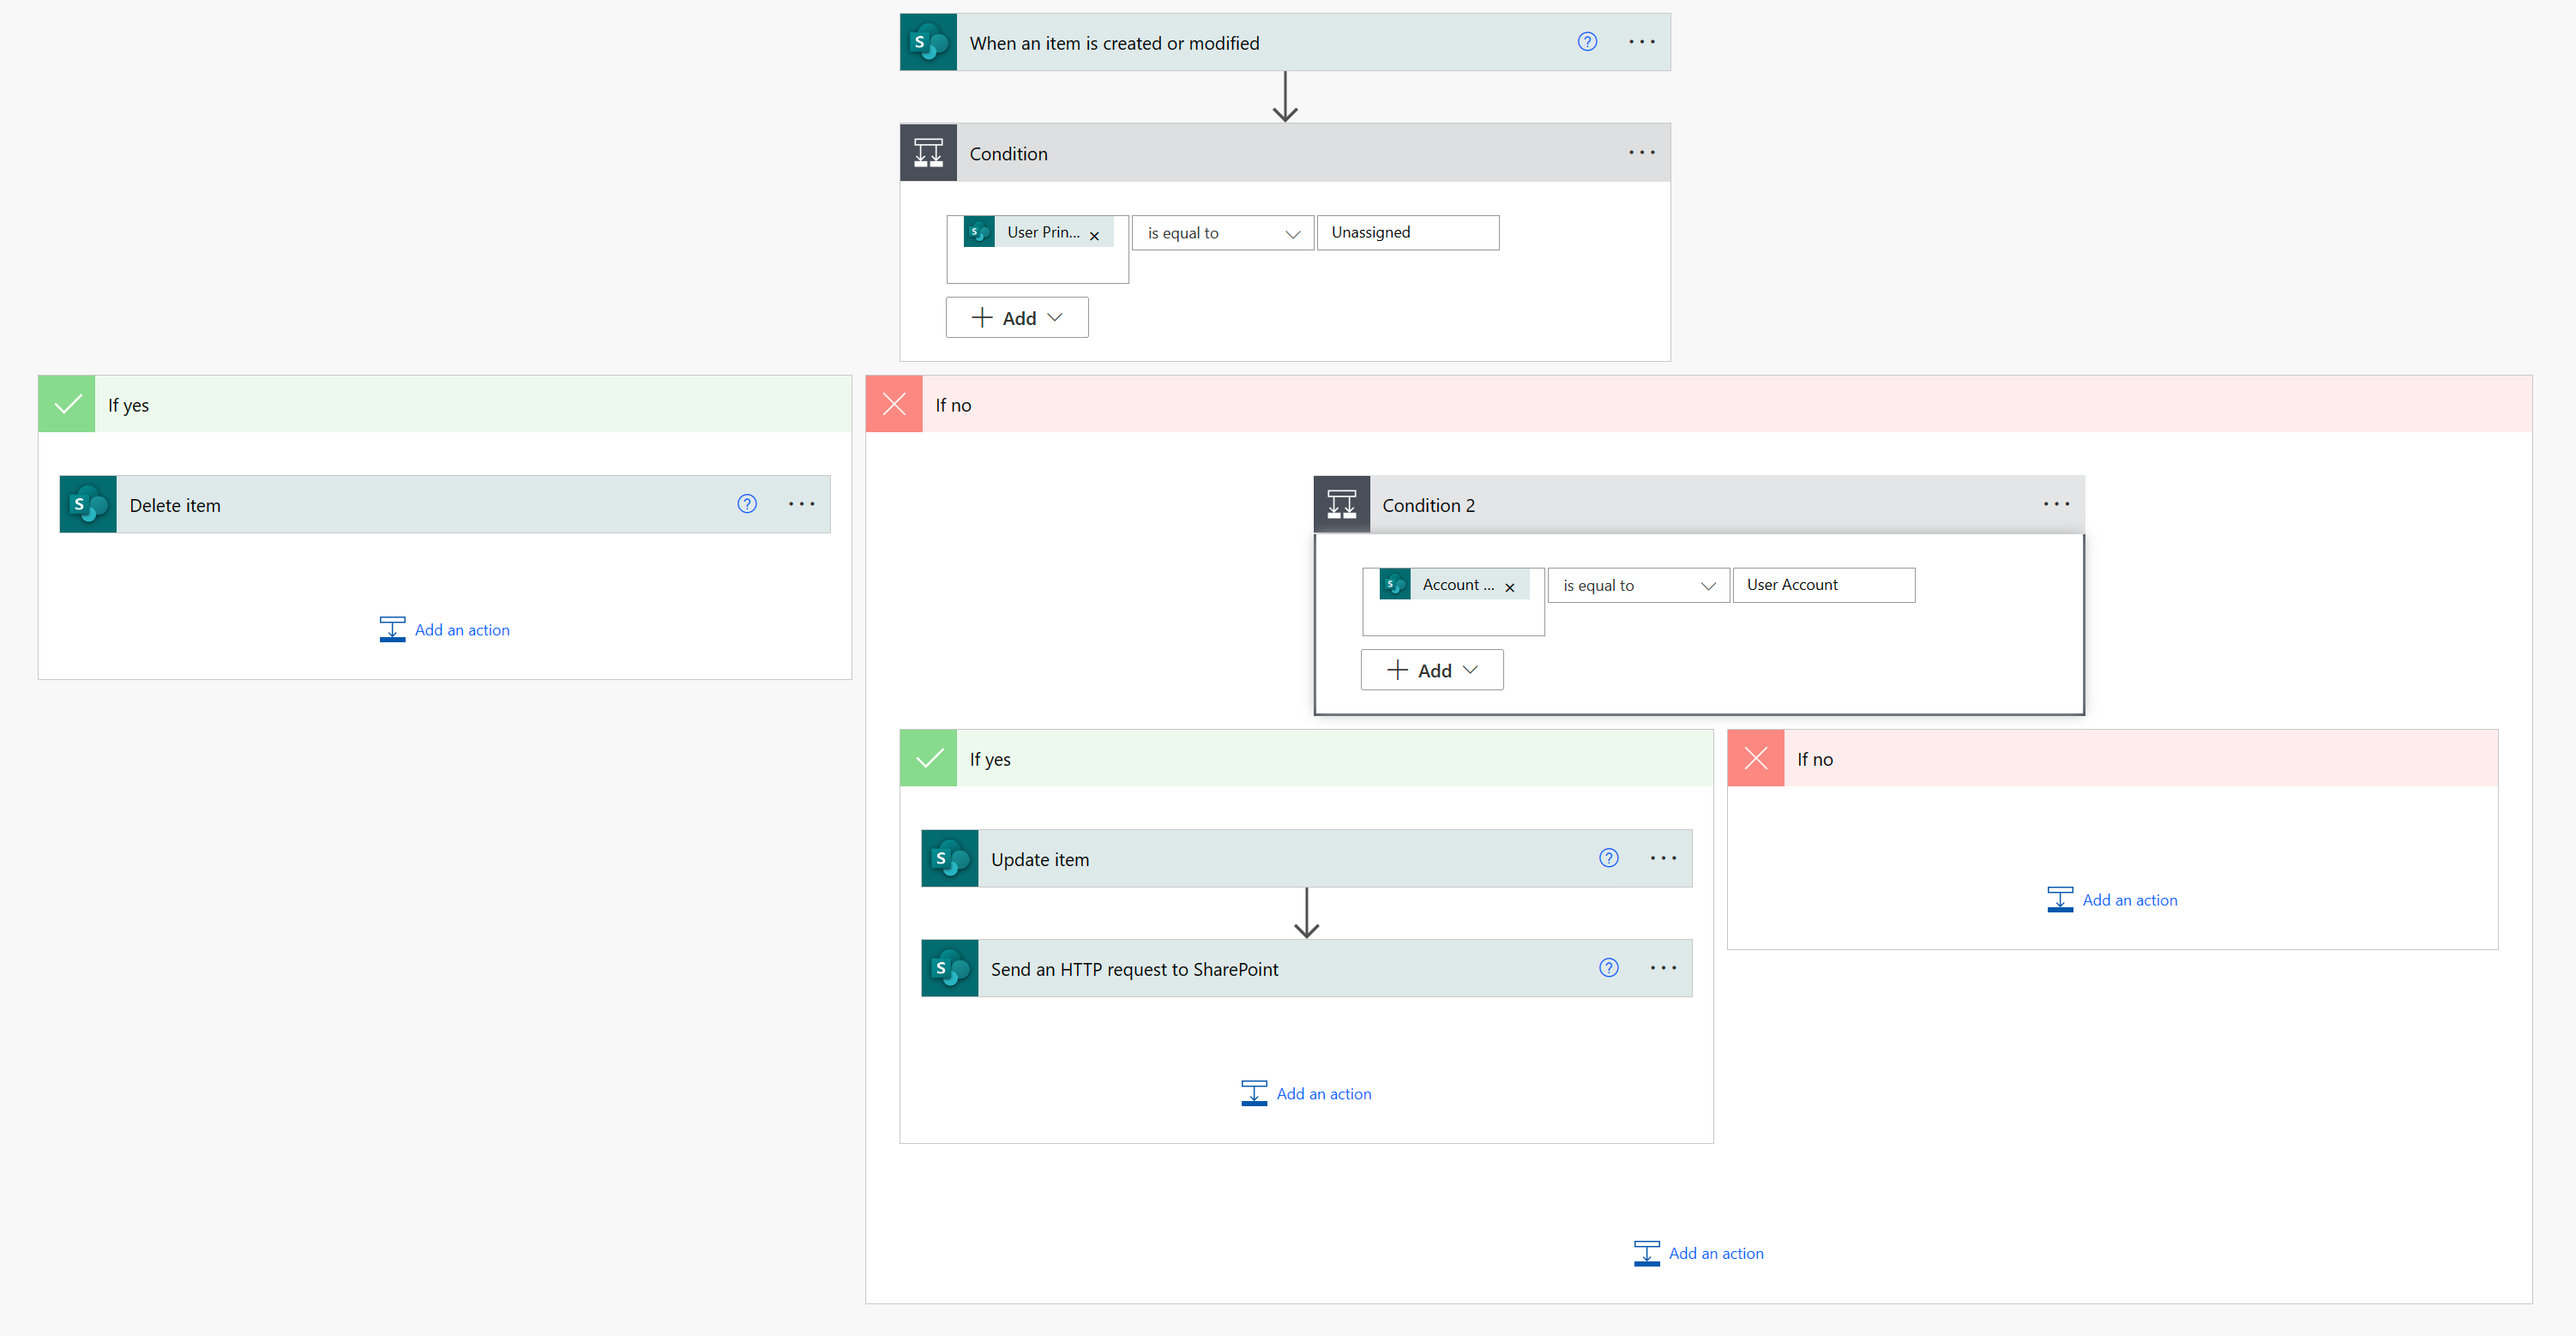
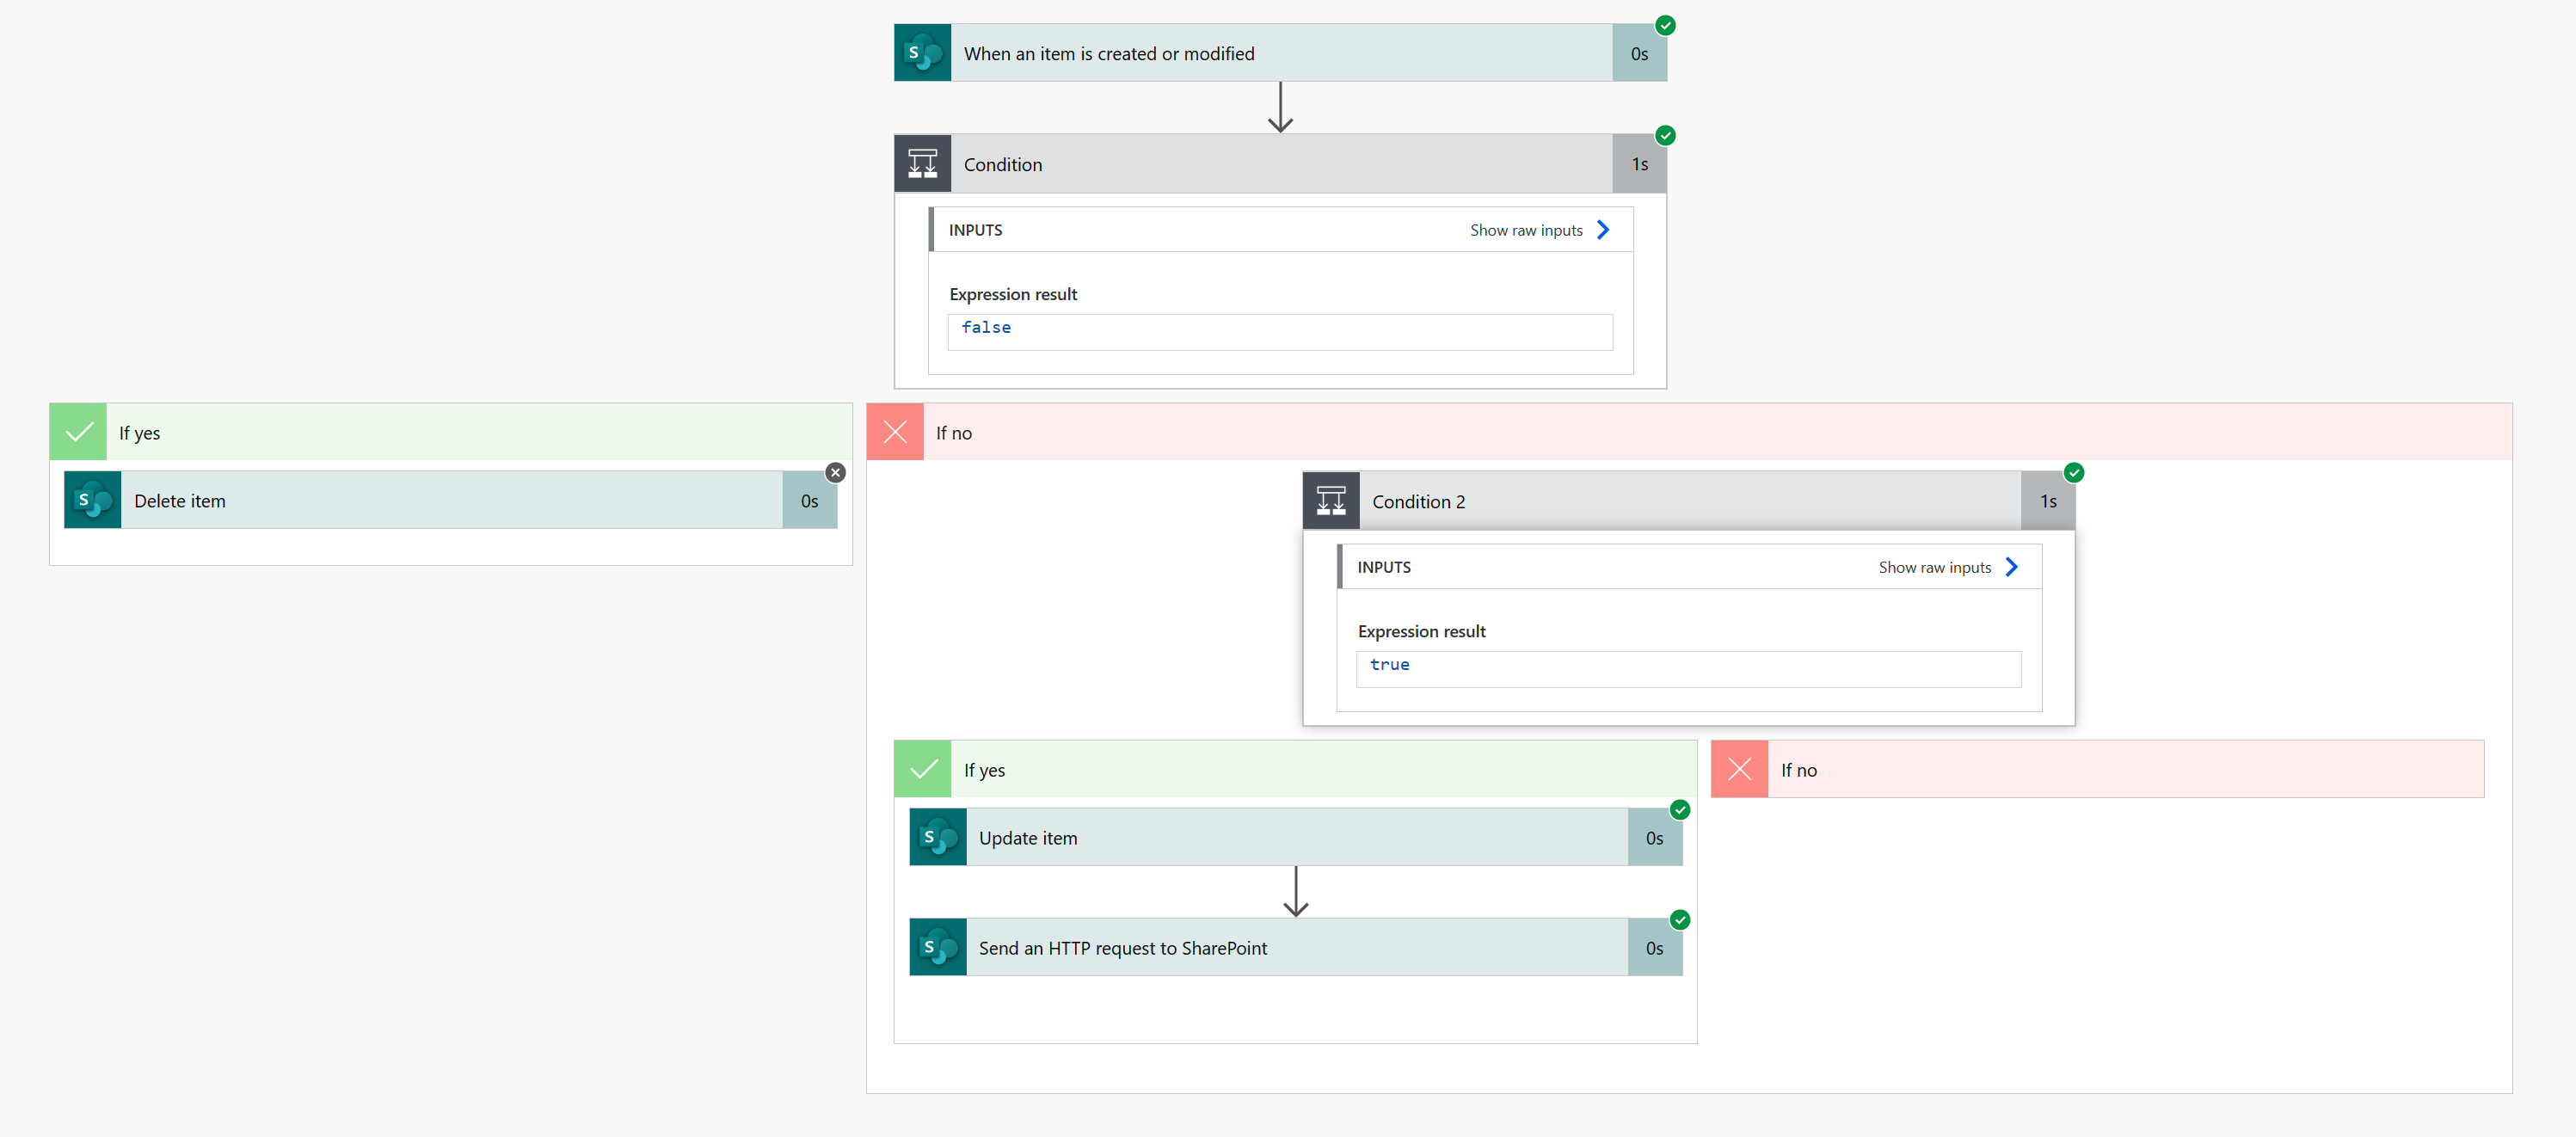
Head over to Microsoft Power Automate and create a new Automated Cloud Flow. Name your flow and select When an item is created or modified (SharePoint) as the trigger.
Select the Site/Team where your list has been created from the drop-down menu in Site Address. Then choose your list from the drop-down.
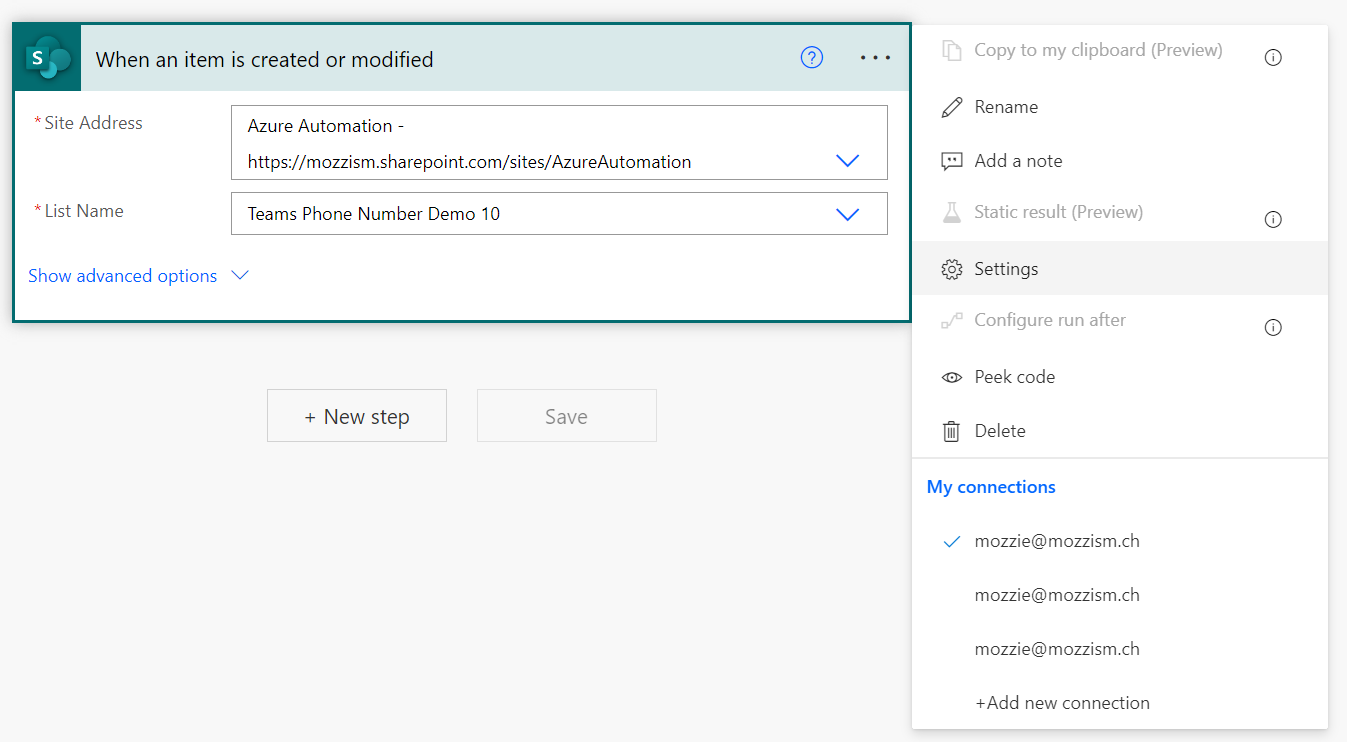
Next, click on the three dots and select Settings.
Add a Trigger Condition and add the following code exactly as it is.
@or(and(not(equals(triggerOutputs()?[‘body/User_x0020_Principal_x0020_Name’], ‘Unassigned’)),not(contains(triggerBody(), ‘UserProfile’))),not(equals(triggerOutputs()?[‘body/User_x0020_Principal_x0020_Name’],triggerOutputs()?[‘body/UserProfile’][‘Email’])))
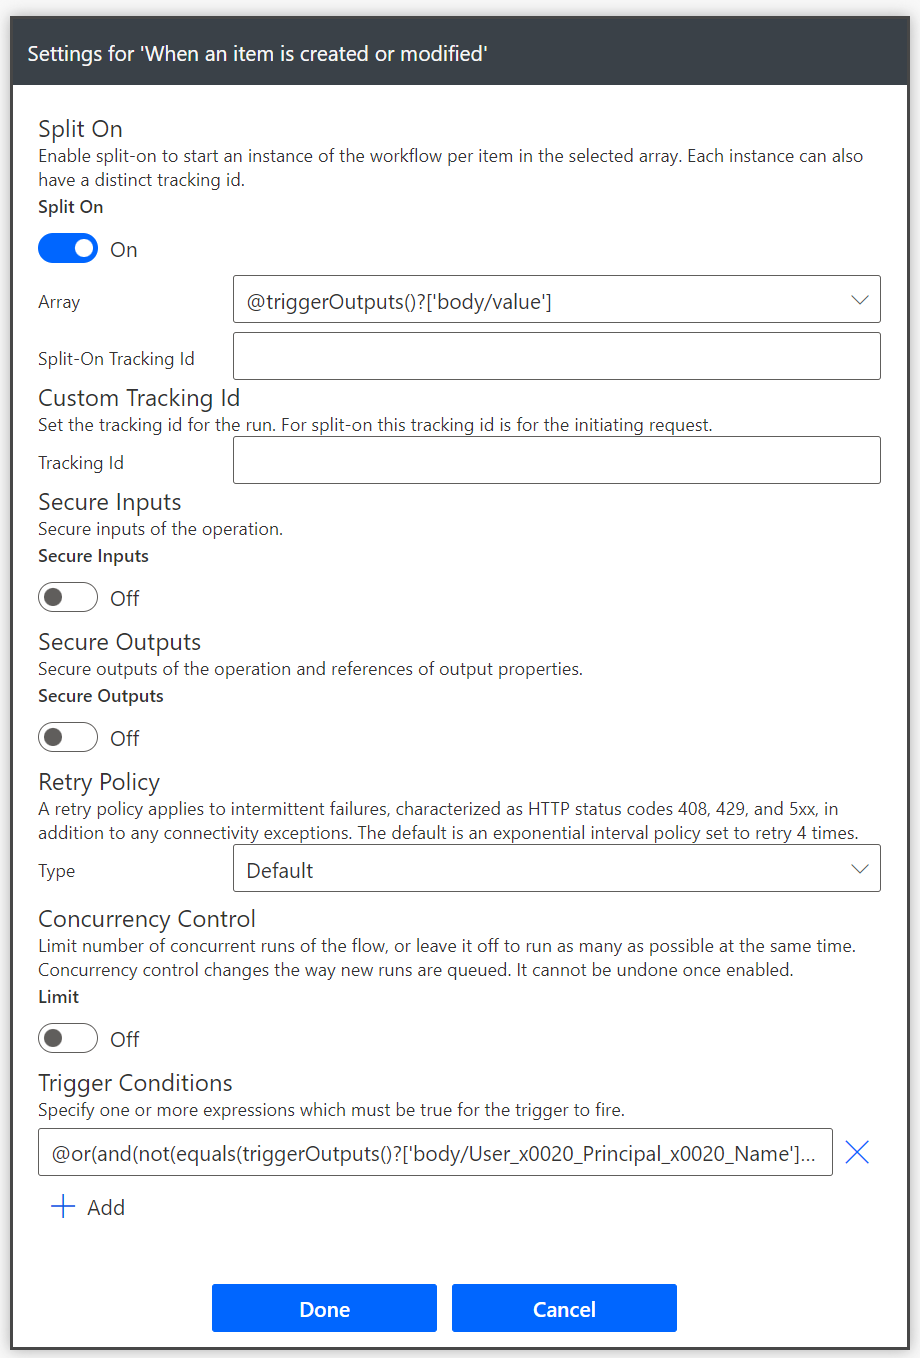
This is the most crucial step. Without a trigger condition, we would create an infinite trigger loop since we use When an item is created or modified as trigger and our final action will be Update item.
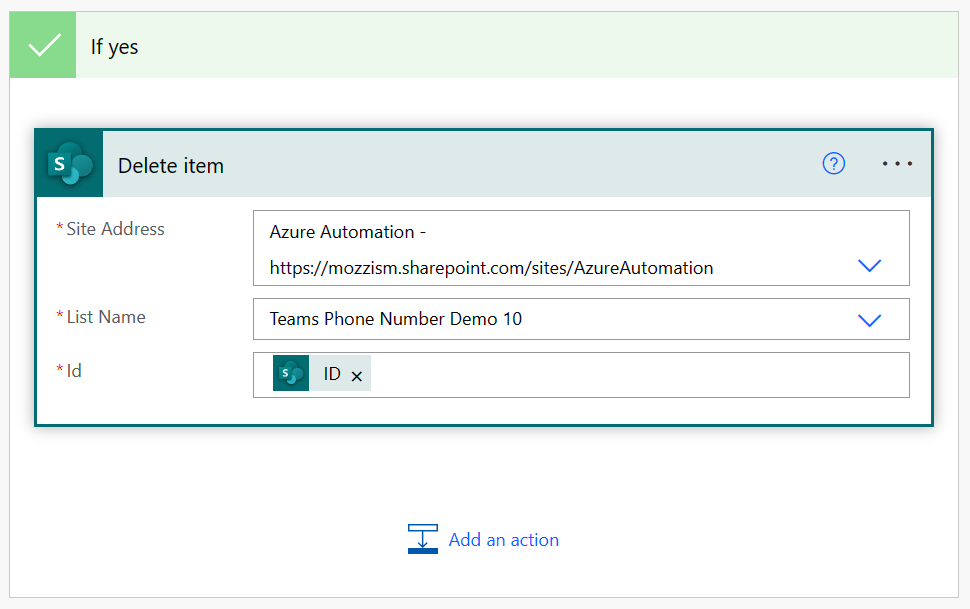
Add a Condition where it checks if the User Principal Name is equal to Unassigned.
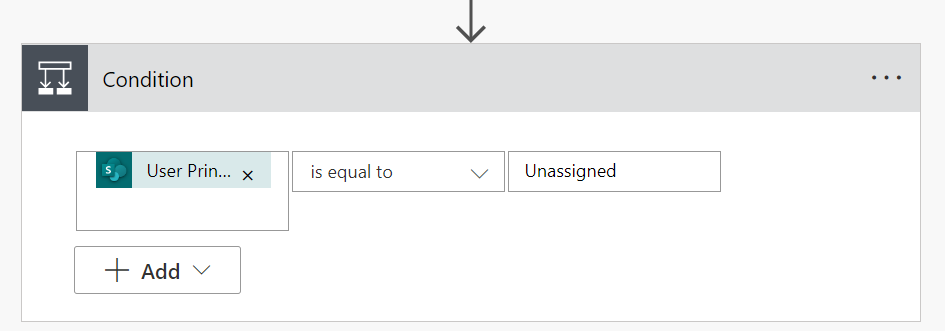
If the condition is True or in other words, if the value of the User Principal Name field is unassigned, we want to delete the list item.
Keep in mind that the flow is only triggered if our trigger condition is met. It took me quite some time and a lot of binging to figure out a working trigger condition for this scenario. (Yes, I really found the answer on Bing without any googling!).
The condition consists of an and operator and an or operator. In English, it checks for the following:
The User Principal Name is not Unassigned and the User Profile is empty.
This means that the flow will trigger if the number is assigned to a user, but the User Profile is not populated yet.
or
The User Principal Name is not the same as the User Profile.
The flow also triggers if the User Profile is already populated but it doesn’t match the User Principal Name.
I didn’t find a way to delete the User Profile if any given number changes from Assigned to Unassigned. Unfortunately, setting the filed to null via the flow did not work. Because of that we just delete the list item using Delete item. The number will be added back to the list with its up to date information as soon as the Runbook runs again.
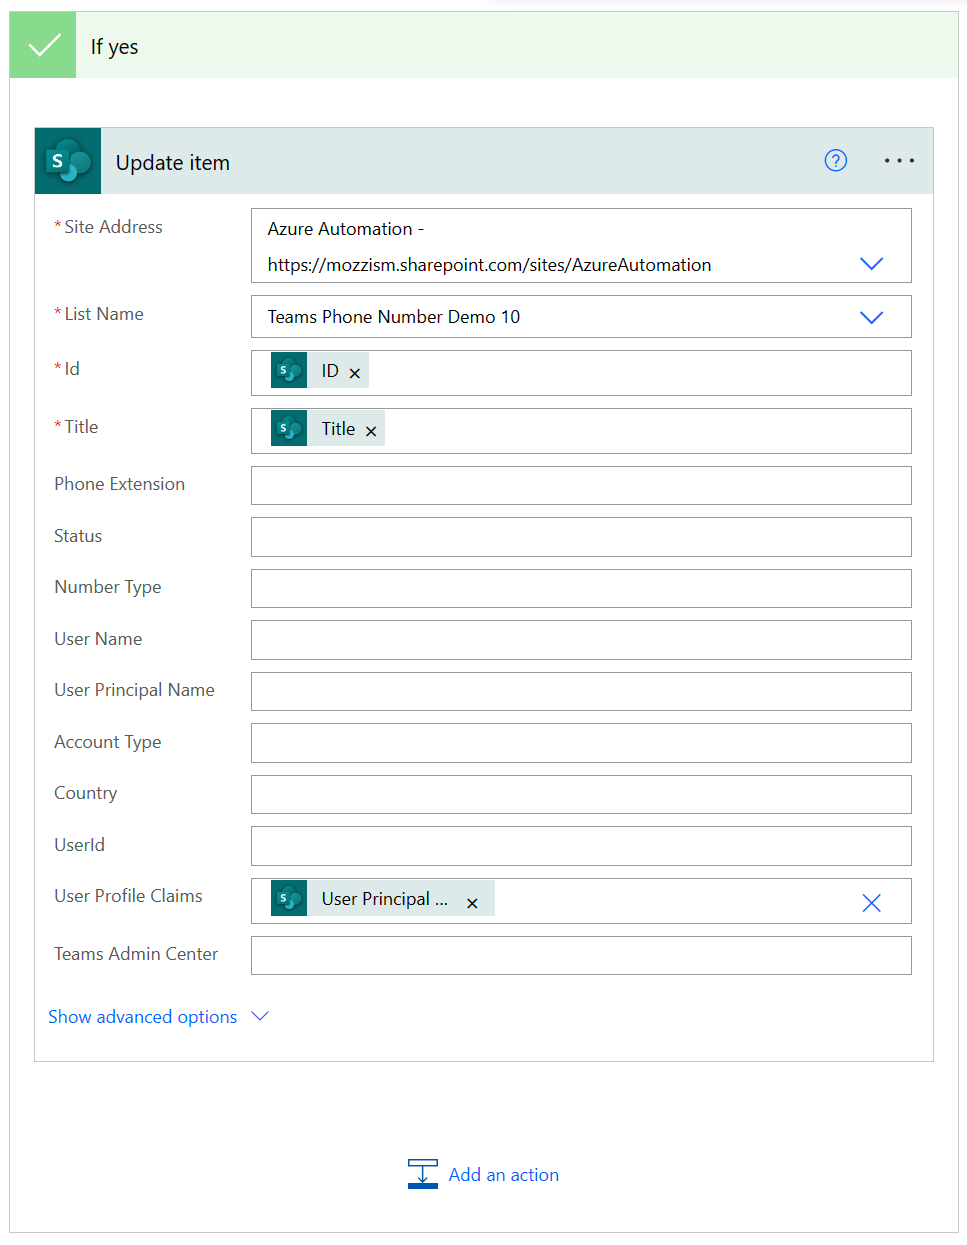
In the If no action of the condition, we need to add another condition. This time, we want to check if the Account Type is equal to User Account. We only want to include a link to Teams Admin Center if it’s a user account.

In this condition, we only configure actions if it’s True. First, we update the list item. Select your Site Address and List Name again. Then fill in the ID and Title from dynamic content. And finally, in User Profile Claims select Enter custom value and choose User Principal Name from dynamic content. Leave all the other fields blank.
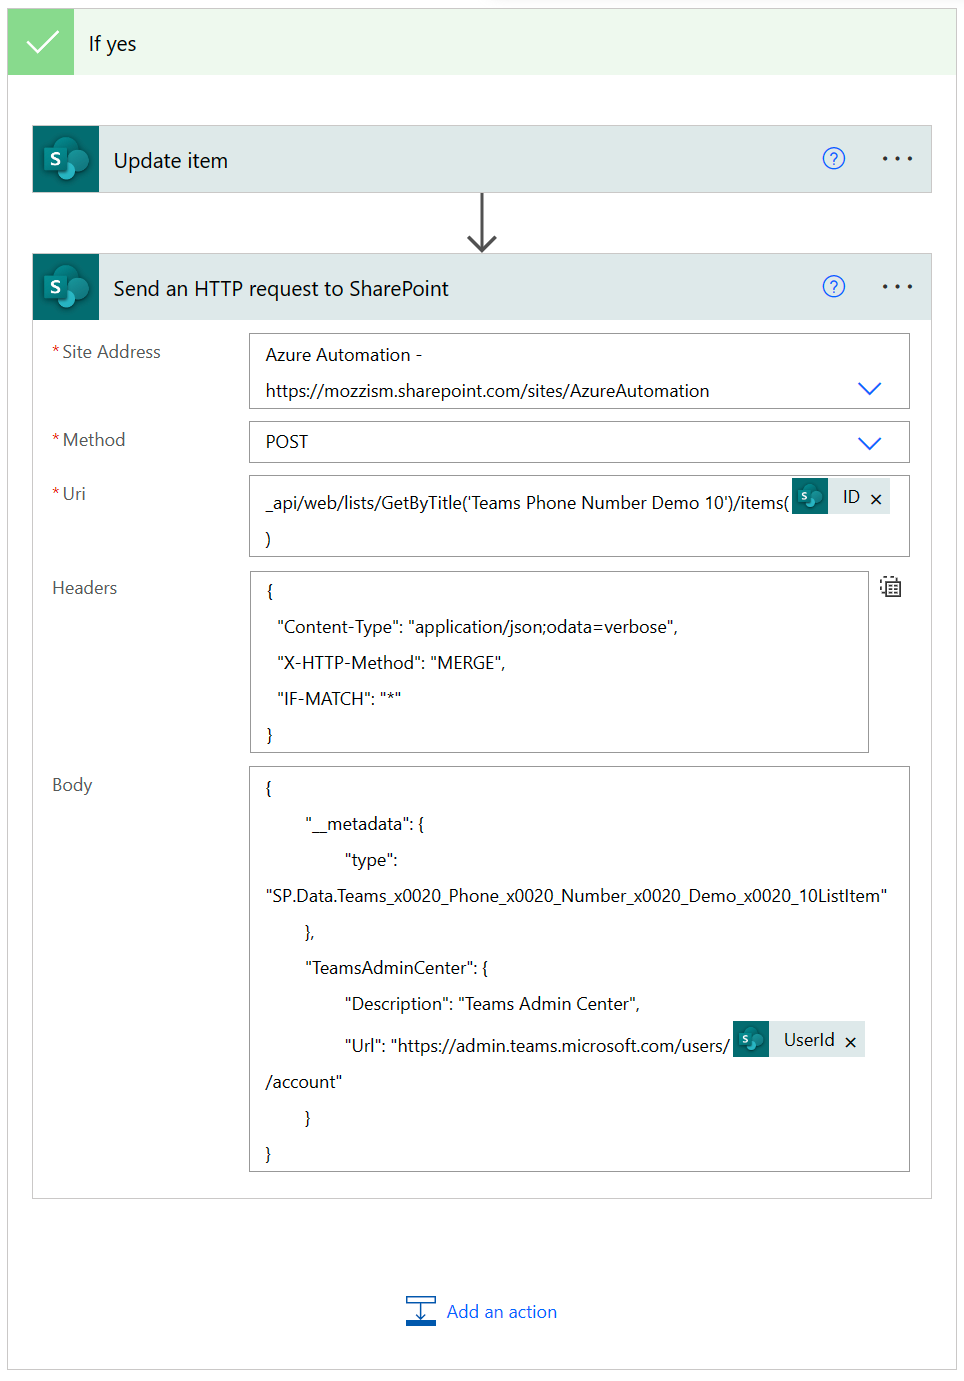
Add another action and choose Send an HTTP request to SharePoint. The Update item action only supports hyperlinks without a description so it would show the entire URL instead of a friendly name in the list. Although it’s more complicated, we can add a hyperlink with a friendly name using Send an HTTP request to SharePoint.
Fill in your Site Address again and set the Method to POST. The Uri must look like this:
_api/web/lists/GetByTitle(‘Teams Phone Number Overview Demo 10’)/items(@{triggerOutputs()?[‘body/ID’]})
Make sure to adjust the list name in case your list is named differently. Spaces inside the single quotes are supported in this field.
Click the little icon next to the Headers field to engage Switch Headers to text mode and paste the following Json:
{
“Content-Type”: “application/json;odata=verbose”,
“X-HTTP-Method”: “MERGE”,
“IF-MATCH”: “*”
}
Then paste the following Json content in the Body:
{
“__metadata”: {
“type”: “SP.Data.Teams_x0020_Phone_x0020_Number_x0020_Demo_x0020_10ListItem”
},
“TeamsAdminCenter”: {
“Description”: “Teams Admin Center”,
“Url”: “https://admin.teams.microsoft.com/users/@{triggerOutputs()?[‘body/UserId’]}/account”
}
}
Again, make sure to adjust the list name to your own. There is no space or any other character between the end of the list name and ListItem . All spaces in the list name must be replaced by _x0020_ .
If you look at the trigger condition again, you might have noticed that the field names like User Principal Name are all written like this: User_x0020_Principal_x0020_Name. I noticed that all columns which contain spaces and have been created via the Graph API are named this way. Teams Admin Center on the other hand has been created manually via SharePoint Online. This column’s reference name is now TeamsAdminCenter as you can see in the screenshot above.
That’s it, we finished building our flow. For reference, here’s the complete layout of the flow without expanded actions.
Force Sync the List
The only problem now is that it won’t be triggered unless the User Principal Name field changes on any of the list entries. The easiest way to get these fields populated is to just delete all list entries of assigned user numbers and re-run the Runbook.
Filter the list by Assigned numbers and Account Type: User Account.

Then delete all the entries and wait for the action to complete.
Now start the Runbook again or wait for the next scheduled job. Once the job has completed, wait another few minutes for the flow to be triggered.
In the flow’s run history, you should then be able to see a couple of successful flow runs. One for each assigned user number which was previously deleted from the list.
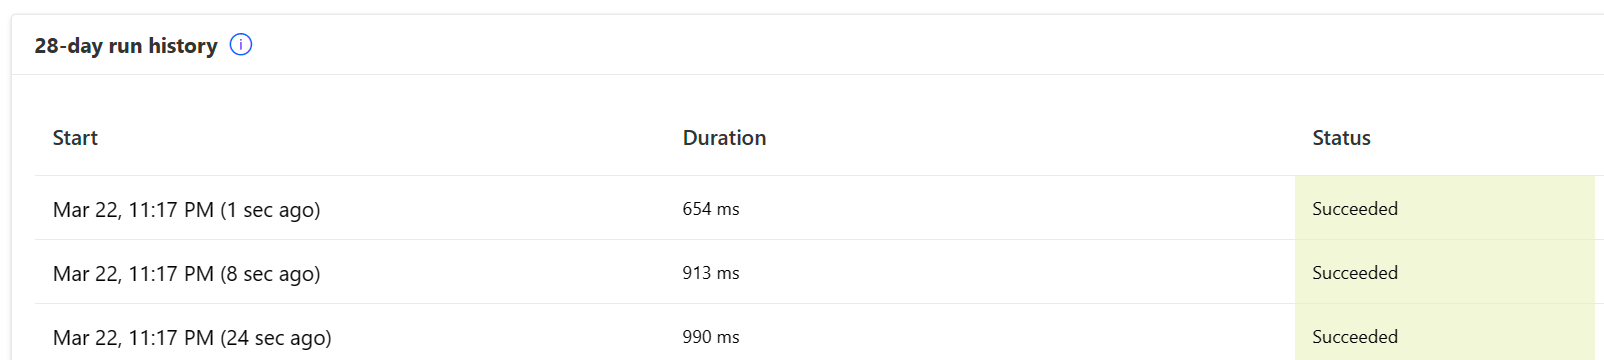
In the details of the flow run, we can see that both the item was updated, and that the HTTP request was made to SharePoint.
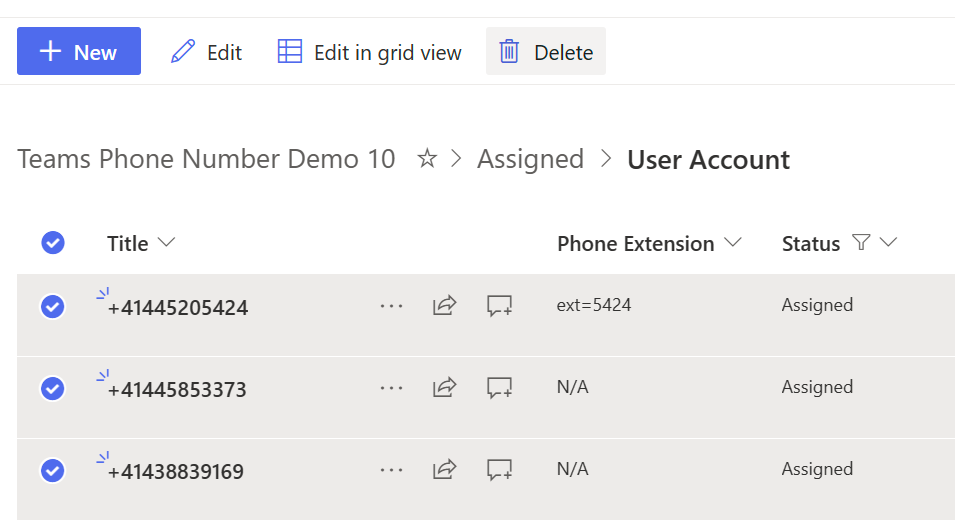
In our SharePoint List, we can now see that both the User Profile and the link to Teams Admin Center have been populated.

Updating the Direct Routing Numbers in Azure
Chances are that you’re going to have more/new Direct Routing numbers at some point. For that scenario, I created another script in .\Setup\UpdateDirectRoutingNumbers.ps1 . This script will compare the contents of the local DirectRoutingNumbers.csv with what’s stored in the Azure Automation Variable. If the content is not the same, the script will overwrite the content of the Automation Variable with your new local source list. This means that you will always need to include all your Direct Routing numbers in the local CSV file, not just new numbers. If you remove numbers from the local source, they will also be removed from the Automation Variable. Hopefully, you won’t have to do this too often.
Conclusion
While this may be a read-only solution and it doesn’t have any management capabilities such as assigning or unassigning phone numbers, I still believe that there’s tremendous value in this. I think that this could be an interesting approach for smaller companies or non-profit organizations which might not have the cash to purchase an expensive number management solution. The costs for running a Runbook job every now and then should be fairly low. According to this website 500 minutes of Job run time is free every month.
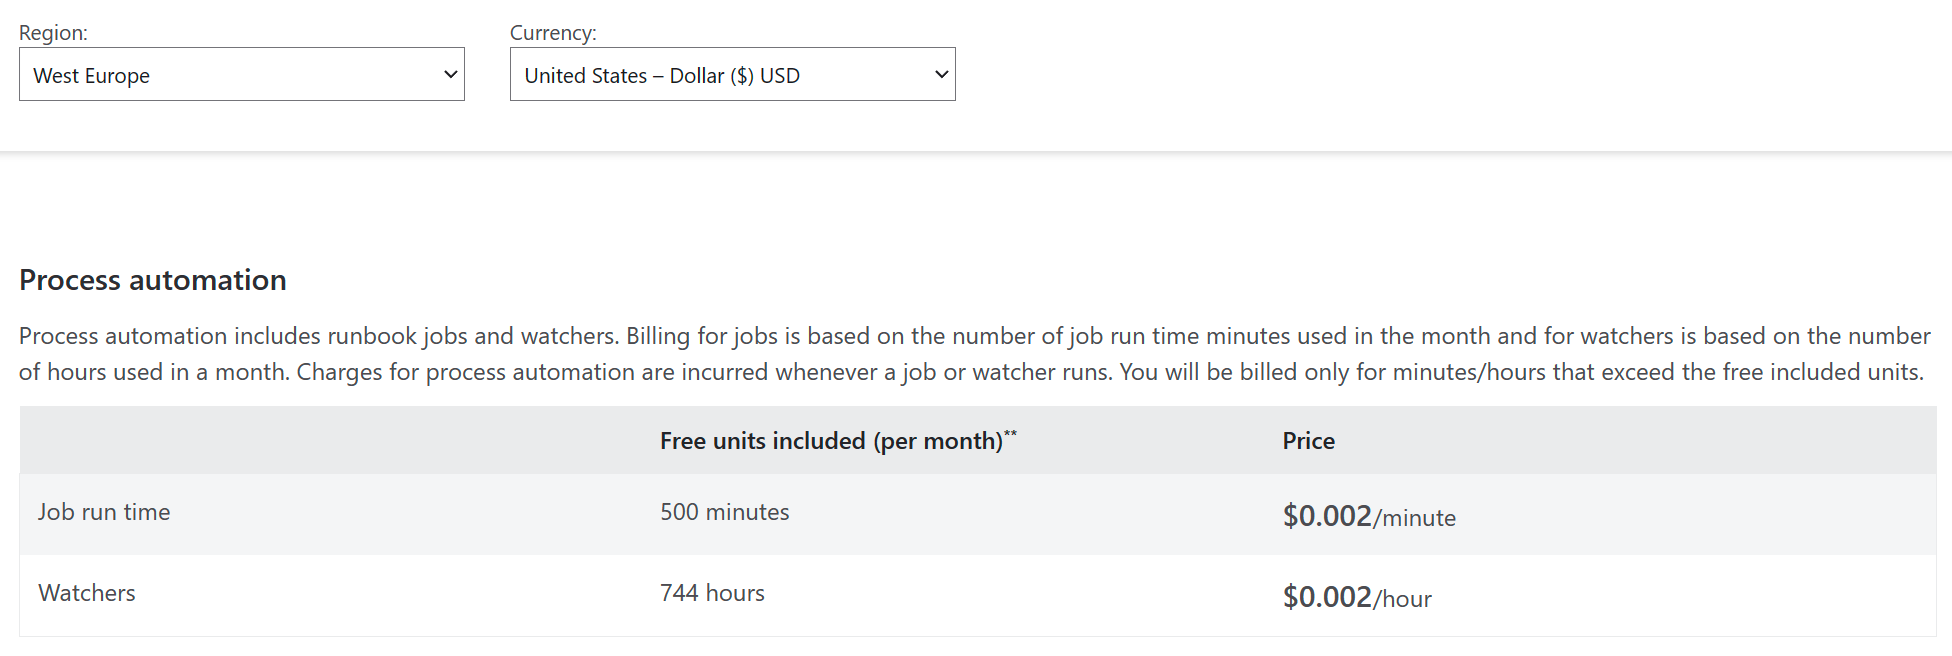
Of course, this depends on the amount of numbers you have. The more numbers you have, the longer it will take for a job to complete. If we assume that each job requires 5 minutes to run, that would be about $ 6.5 per month if the job runs every hour every day of a month.
With this, we can finally have a complete, dynamically updated list of all our phone numbers and their state regarding their type. On top of that, we can make it accessible easily for all users or admins who need to work with this kind of information. For example, we could also add the list as a Tab in a Microsoft Teams Channel.
Final Notes
I invested a lot of time to perfect this project and I’m incredibly happy to be finally able to share it with the community and my readers on Medium. I tested both the deployment to Azure and the Runbook logic quite a few times so I’m fairly confident that this should work in other Tenants as well. Since I don’t have any Operator Connect numbers available, I couldn’t test that yet. If you are an Operator Connect customer and want to try this solution, feel free to let me know if it worked for you.
I mainly tested populating and updating the list with about forty numbers of mixed types. I did make some quick tests (and adjustments) with a list of about 1000 Direct Routing numbers and that has worked well for me so far. If you manage a lot of phone numbers and want to try the solution yourself, I’m also happy if you can provide feedback on how it performs with even more numbers.
As always, I hope you like what I’ve been up to!