Today we’re going to take a detailed look at Teams Resource Accounts.
Resource Accounts are special Azure AD Objects (or Microsoft 365 User Accounts, if you will) which can only be created from Teams Admin Center or via Teams PowerShell. It’s not possible to create such an account in M365 Admin or Azure AD. What’s funny though is that they can only be deleted from M365 Admin or AAD but not from Teams Admin Center or Teams PowerShell.
The Basics
Currently, there are two different types of so called first-party (Microsoft) Resource Accounts. Call Queues and Auto Attendants. These accounts are then associated with corresponding types of Voice App, which are again, Call Queues or Auto Attendants.
Each Resource Account can only be associated with one Voice App, but a Voice App can have multiple Resource Accounts associated. Just like with Teams users, each Resource Account can also only have one phone number assigned. For example, you can have an Auto Attendant which has multiple Resource Accounts assigned, where each Resource Account has a phone number from a different country. This way you can have an Auto Attendant which serves customers across multiple countries, but each customer will be able to call a local number.
How to Create a Resource Account
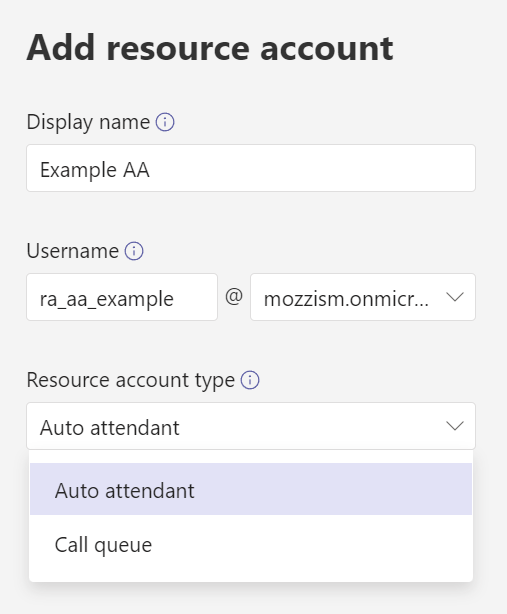
You can create new Resource Accounts from TAC. They are located under Voice\Resource accounts.
There are a few things to consider here. The first one is naming. If you have a complex call flow, chances are that you will have many Auto Attendants, Call Queues and Resource Accounts. I always use a prefix and suffix system.
The Display Name is followed by the suffix “AA” or “CQ”. This way it will be easier to identify the correct Resource Account, when you associate it with a Voice App. The User Principal Name is led by the prefix “ra_aa_” or “ra_cq_” so that they can easily be filtered in AAD. Of course, this is only a suggestion, you’re free to name them however you want.
Usually, I just use the *.onmicrosoft.com name of the Tenant as the domain suffix. External users won’t be able to interact with these kinds of accounts, so it doesn’t matter if you don’t use your default custom domain name.
Here are the PowerShell equivalent commands to create Resoure Accounts.
Auto Attendant:
| |
Call Queues:
| |
Searching for Resource Accounts
If you want to return all Resource Accounts by PowerShell, the MicrosoftTeams Module 4.6.0 now supports a parameter to only return Resource Accounts: Get-CsOnlineUser -AccountType ResourceAccount . If we didn’t include a prefix or a suffix, there’s currently no way to tell if the returned objects are Queues or Attendants.
For that, we need to useGet-CsOnlineApplicationInstance . This will return a list with some basic information like Display Name, UPN, Phone Number and Application Id.
Licensing Resource Accounts
A Resource Account must be licensed in the following cases:
- If you want to assign a phone number to it
- If the Resource Accounts needs to be able to transfer calls to external numbers
Update 29.01.2023
Microsoft updated their documentation. From now on, every Resource Account must be licensed, regardless of if a phone number is assigned or not. You can find more info here.
An easy way to ensure that every Teams Resource Account is licensed properly is to use a dynamic user Azure AD Group which automatically assigns the license. The easiest way to do so is to filter on the Department attribute.
| |
If you need step-by-step instructions on how to create an Azure AD Group with a dynamic query, please consult this article and just replace the query with the one above.
/Update
Update 06.02.2023
Thanks to a reader comment, it was brought to my attention, that group based licensing actually requires an Azure AD Premium P1 license, for any user which takes advantage of the feature. This is documented here.
I don’t know if a resource account qualifies as “user” because they are resource account and sign-in blocked. If you want to be absolutely sure, I recommend that you have a P1 license for each resource account or that you contact your account manager at Microsoft and ask them about this.
/Update
Licensing can’t be done from TAC. We need to use AAD or M365 Admin. As we can see, the account “Example AA” has now been created in AAD.
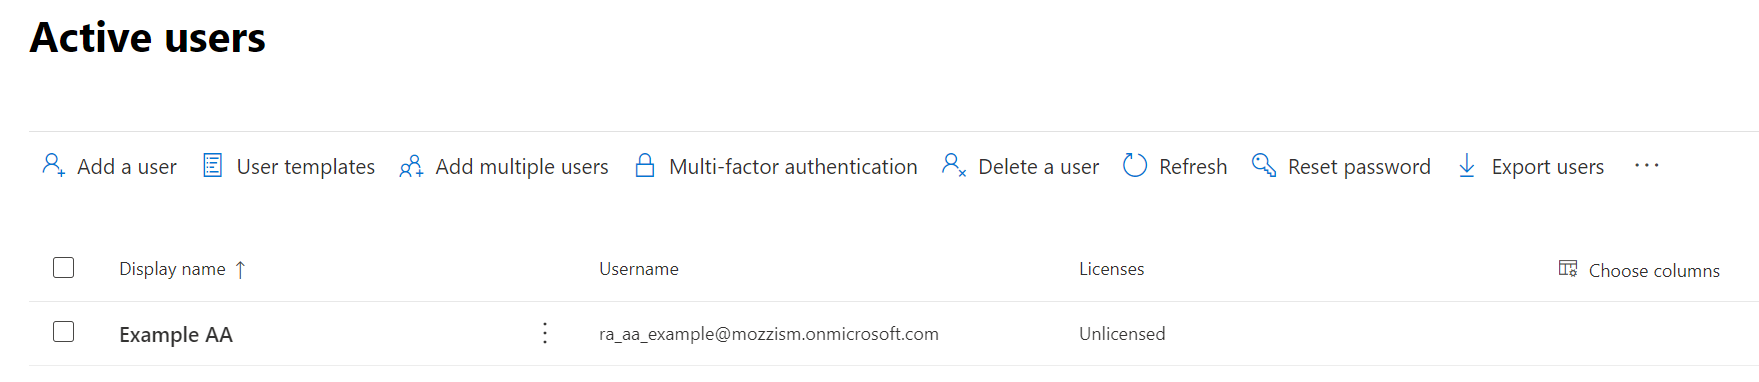
Because this is a special kind of account, it’s Sign-in blocked. This means that the account doesn’t support interactive sign-ins.

Another important info is that these accounts have “Microsoft Communication Application Instance” set as their department. Just leave this as it is and don’t change anything.

Based on my experience, it’s no problem to change its Display or User Principal Name though.
If you want to assign a phone number to a Resource Account, you will need to assign a license to it. Microsoft has recently renamed the old license “Microsoft Teams Phone — Virtual User” to “Microsoft Teams Phone Resource Account”.

What’s really nice about these licenses, is that their free. At least to some extent. If you have at least one Teams Phone license, you will get 25 Teams Phone Resource Account licenses for free. After that, you will get 1 Resource Account license for every 10 Teams Phone licenses. The “PowerShell Name” or rather the AccountSkuId of this license is still called “TenantName:PHONESYSTEM_VIRTUALUSER”. Unlike Teams Phone which needs a “base license” like a Business Premium or Enterprise E3, Resource Account licenses can be assigned as standalone licenses.
How to Assign Phone Numbers to Resource Accounts
Once you’ve assigned a license to a Resource Account you can either use TAC or PowerShell to assign a phone number to the account.

For PowerShell, you can use the same command as you would with a normal user. You might stumble upon outdated articles which mention the following command.
| |
The new one is the following:
| |
Even though the Resource Account now has a phone number assigned to it, the number won’t be active until the Resource Account is associated with a Voice App. We’ll get to that later.
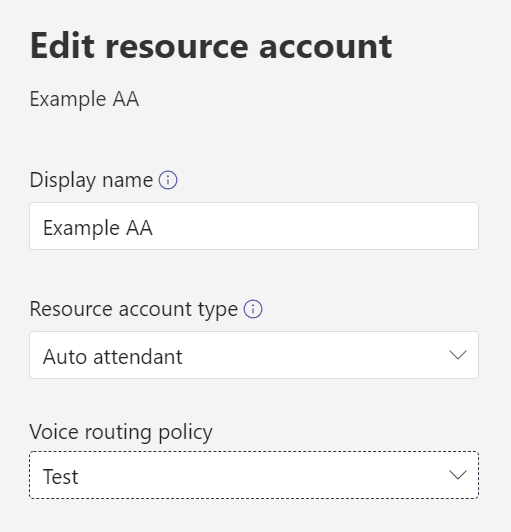
How to Assign a Voice Routing Policy to a Resource Account
If the Resource Account should be able to transfer calls to external PSTN numbers using Direct Routing, we will also need to assign a Voice Routing Policy to it. This can also be done from TAC. Select your Resource Account and click on Edit. Now choose your desired Voice Routing Policy and click Save.
Doing it with PowerShell is again, the same as if it was a normal user.
| |
How to Change the Type of a Resource Account
On that same “Edit resource account” window, it’s also possible to change the type of a Resource Account. This can also be done by PowerShell. Just use the Set-CsApplicationInstance cmdlet and include the -Identity and -ApplicationId parameters. Even though this should work in theory, I haven’t tested it myself since I recommend re-creating them, if ever needed. Also be careful when 3rd party resource accounts e.g. from Attendant Console or Contact Center vendors are in play. TAC only supports first party Application Ids and won’t allow you to save changes you made without choosing a Resource Account type. Use PowerShell if you need to assign an online voice routing policy to a 3rd party resource account.
How to Associate a Resource Account with a Voice App
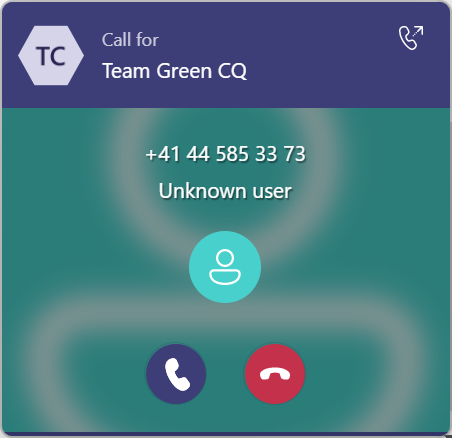
In most cases, having one Resource Account per Queue or Attendant is enough. Let’s make a small detour and talk about naming again for a second. To avoid confusion, I always make sure that the Display Name for the Queue/Attendant and the Resource Account are the same. If a Voice App needs multiple resource accounts, I use numbering on the resource account names. It’s important to note that the Display Name of the Resource Account is the name which a recipient of a call which was transferred by an Attendant or a Queue will see on the Teams toast notification.
Here we can see that this Call Queue is called “MS Test CQ” but the associated resource account is called “Team Green CQ”.
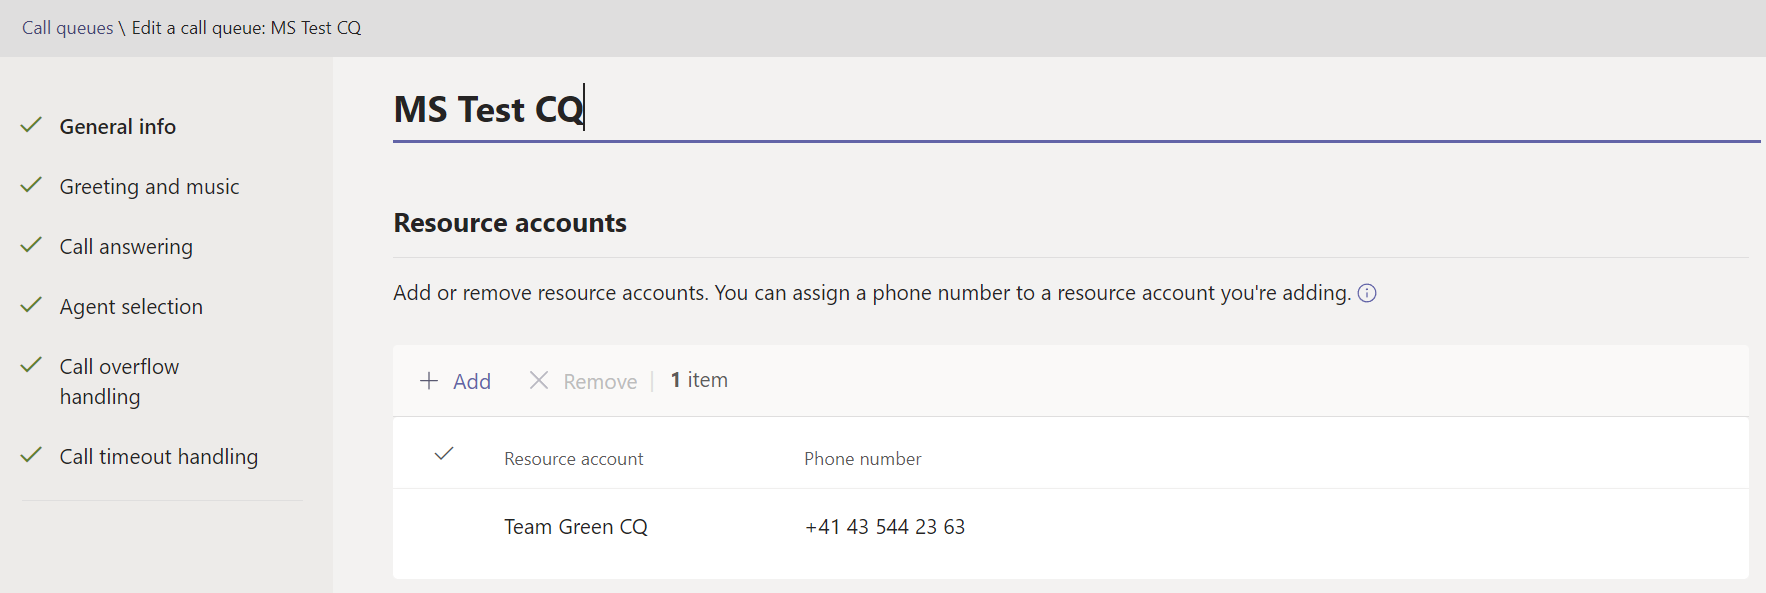
Since the toast will show the Display Name of the resource account, it will say that there’s a call for “Team Green CQ” and not “MS Test CQ”.
I talked about the importance of the AA/CQ suffix at the beginning of this post. Microsoft has improved TAC and now shows assigned phone numbers in the drop-down list, if we search for a Voice App redirection target.
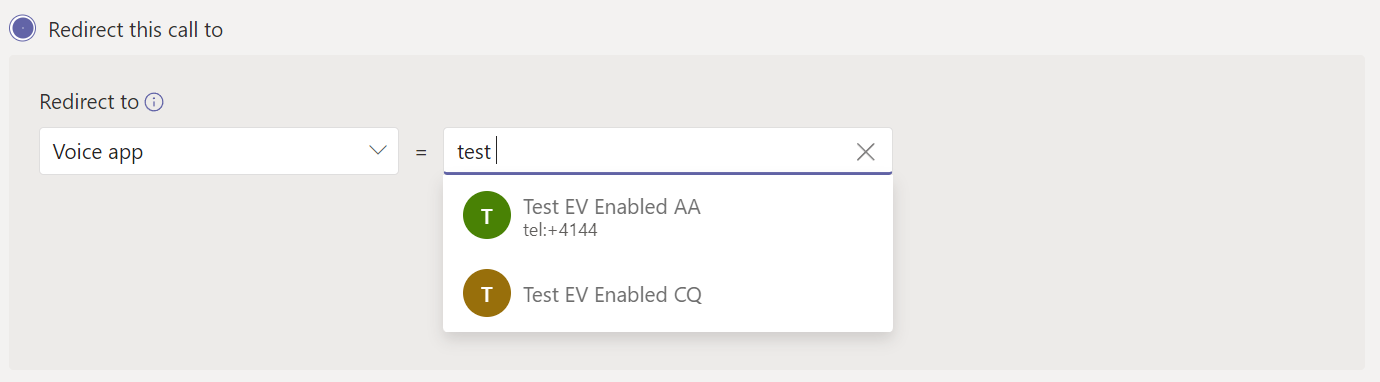
But let’s assume that neither of these accounts had a phone number assigned and we didn’t use a suffix either. Good luck figuring out which one of these is the Auto Attendant and which one is the Call Queue.
Enterprise Voice
This is an interesting one. As far as I can tell, resource accounts which were created at least a few months ago, are still Enterprise Voice enabled, even if they don’t have a Teams Phone Resource Account License assigned.
Here’s an example of such a relict. This resource account is Enterprise Voice enabled, despite not having a LineURI or a Feature Type. FeatureTypes is a relatively new property which is returned by Get-CsOnlineUser .
| |
For reference, here’s a screenshot of the M365 Admin Portal.

If we check “Support Number AA” (which does have a license) by PowerShell using the search query below, we can see that it includes “VoiceApp” under FeatureTypes.
| |
Output:
| |
FeatureTypes : {VoiceApp}
If we check a normal Teams user account, we can see that they’ll have “PhoneSystem” and “Teams” included in their FeatureTypes.
DisplayName : Ben Kim
EnterpriseVoiceEnabled : True
FeatureTypes : {PhoneSystem, Teams}
But beware that a user can also include the Feature Type “PhoneSystem” without actually being Enterprise Voice enabled. (In this case the user has a Teams Phone License but is not configured for EV yet.)
DisplayName : Bill Stearn
EnterpriseVoiceEnabled : False
FeatureTypes : {PhoneSystem, Teams}
I wasn’t able to reproduce this scenario. When I created a new resource account and didn’t assign a license, it was always set to Enterprise Voice enabled False.
DisplayName : Example PS AA
EnterpriseVoiceEnabled : False
FeatureTypes : {}
Let’s see how this looks, after we’ve added a Microsoft Teams Phone Resource Account License to “Example PS AA”. After a few minutes, the Feature Type will be added, and EV will be set to True. I was spamming the Get-CsOnlineUser query so often, that I even managed to get an output right before and after the change.
Here we can see that the Feature Type “VoiceApp” was added but Enterprise Voice was still disabled.
DisplayName : Example PS AA
EnterpriseVoiceEnabled : False
FeatureTypes : {VoiceApp}
Literally seconds later, I ran it again and now Enterprise Voice has been enabled.
DisplayName : Example PS AA
EnterpriseVoiceEnabled : True
FeatureTypes : {VoiceApp}
Assigning the license will automatically set Enterprise Voice enabled to True. This is different than with normal user accounts. They will stay False until we either assign them a number through TAC or use Set-CsPhoneNumberAssignment -EnterpriseVoiceEnabled $true .
If the license is removed from the resource account, EV will be disabled again.
External PSTN Transfer from Resource Accounts
The official documentation of the technical requirements which are needed for external PSTN transfers can be viewed here. I’m only covering Direct Routing Scenarios in this article.
These requirements need to be met by all resource accounts which are associated with a Voice App. For example, if you have an Auto Attendant which has two resource accounts / numbers assigned and it forwards to an external number outside of business hours, both resource accounts will need to have a valid voice routing policy assigned. TAC won’t display a warning or an error message, even if none of the associated resource account have an online voice routing policy assigned. So, in other words: If a call is made to a Resource Account which doesn’t have a voice routing policy assigned, the call transfer will fail.
What about nesting? Although I don’t think that this is officially documented, I have found that only the top-level resource account, which is the one with the number which is dialed, needs to be configured properly.
Let’s take a look at the configuration of the resource accounts used in this scenario.
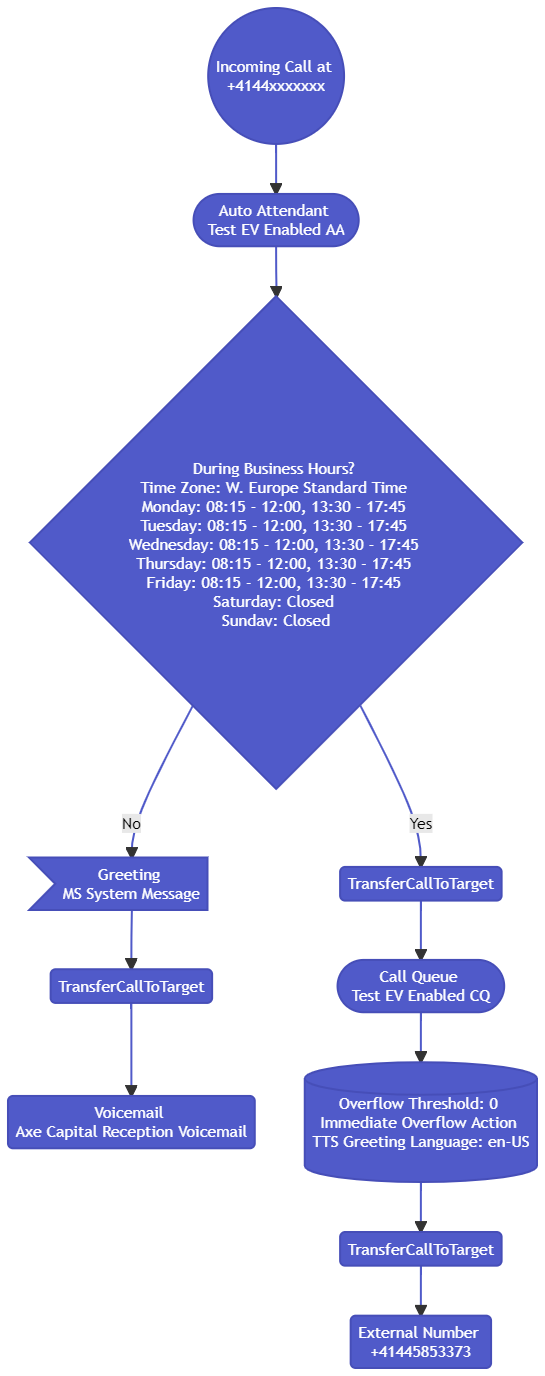
Obviously, the Call Queue “Test EV Enabled CQ” and not the “Test EV Enabled AA” does the PSTN transfer. But only the Auto Attendant is configured for outbound PSTN calling. The call transfer in this scenario works.
| |
In the PSTN and SMS (preview) usage report in TAC, we can see that it’s the initially called resource account, rather than the one associated with the call queue which does the outbound call. Outbound Direct Routing calls from Voice Apps are labelled as “dr_out_bot”.

To be absolutely sure, I created another configuration. This time the other way around. The top-level Auto Attendant does not have an online voice routing policy assigned, but the nested Call Queue does.
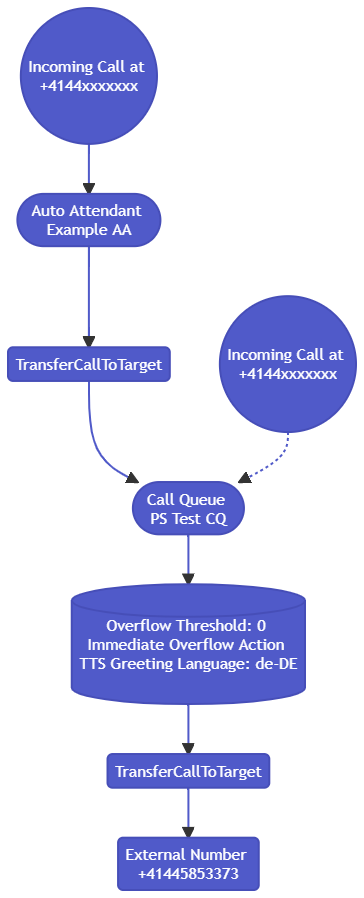
When I called the number of the Auto Attendant, the PSTN transfer of the Call Queue did not work, even though the Queue is configured for outbound calling. When I called the number of the Queue directly, forwarding to PSTN worked perfectly.
P.S. If you’re wondering, how I created that flow chart and didn’t get the memo before, besides blogging, I’m also the creator of this PowerShell Tool which allows anybody to automatically render these cool diagrams for free.
Finding Auto Attendants and Call Queues in Teams
If you can’t find all your Auto Attendants and Call Queues when you search for them in Teams, you should definitely take a look at this article.
One Last Thing
Although it’s now possible to do most of the things, like assigning online voice routing policies or phone numbers in TAC, some things are still missing from TAC. For example, you won’t find your resource accounts under “Manage users”. You can, however, replace the Object Id of a user in the URL, with an Object Id of a Resource Account. This will allow you to view some data, like recent calls.
If you’re too lazy to grab the Object Id, you can also click the Display Name of a Resource Account from the PSTN and SMS (preview) usage report.

This will yield an error message that TAC can’t get the policies of this account. But you’ll still be able to see it’s call history under the “Meetings & calls” tab.

I hope this article helps you better understand how Resource Accounts work in Teams Phone. Feel free to reach out if you have any questions left.